Soft Pretzels

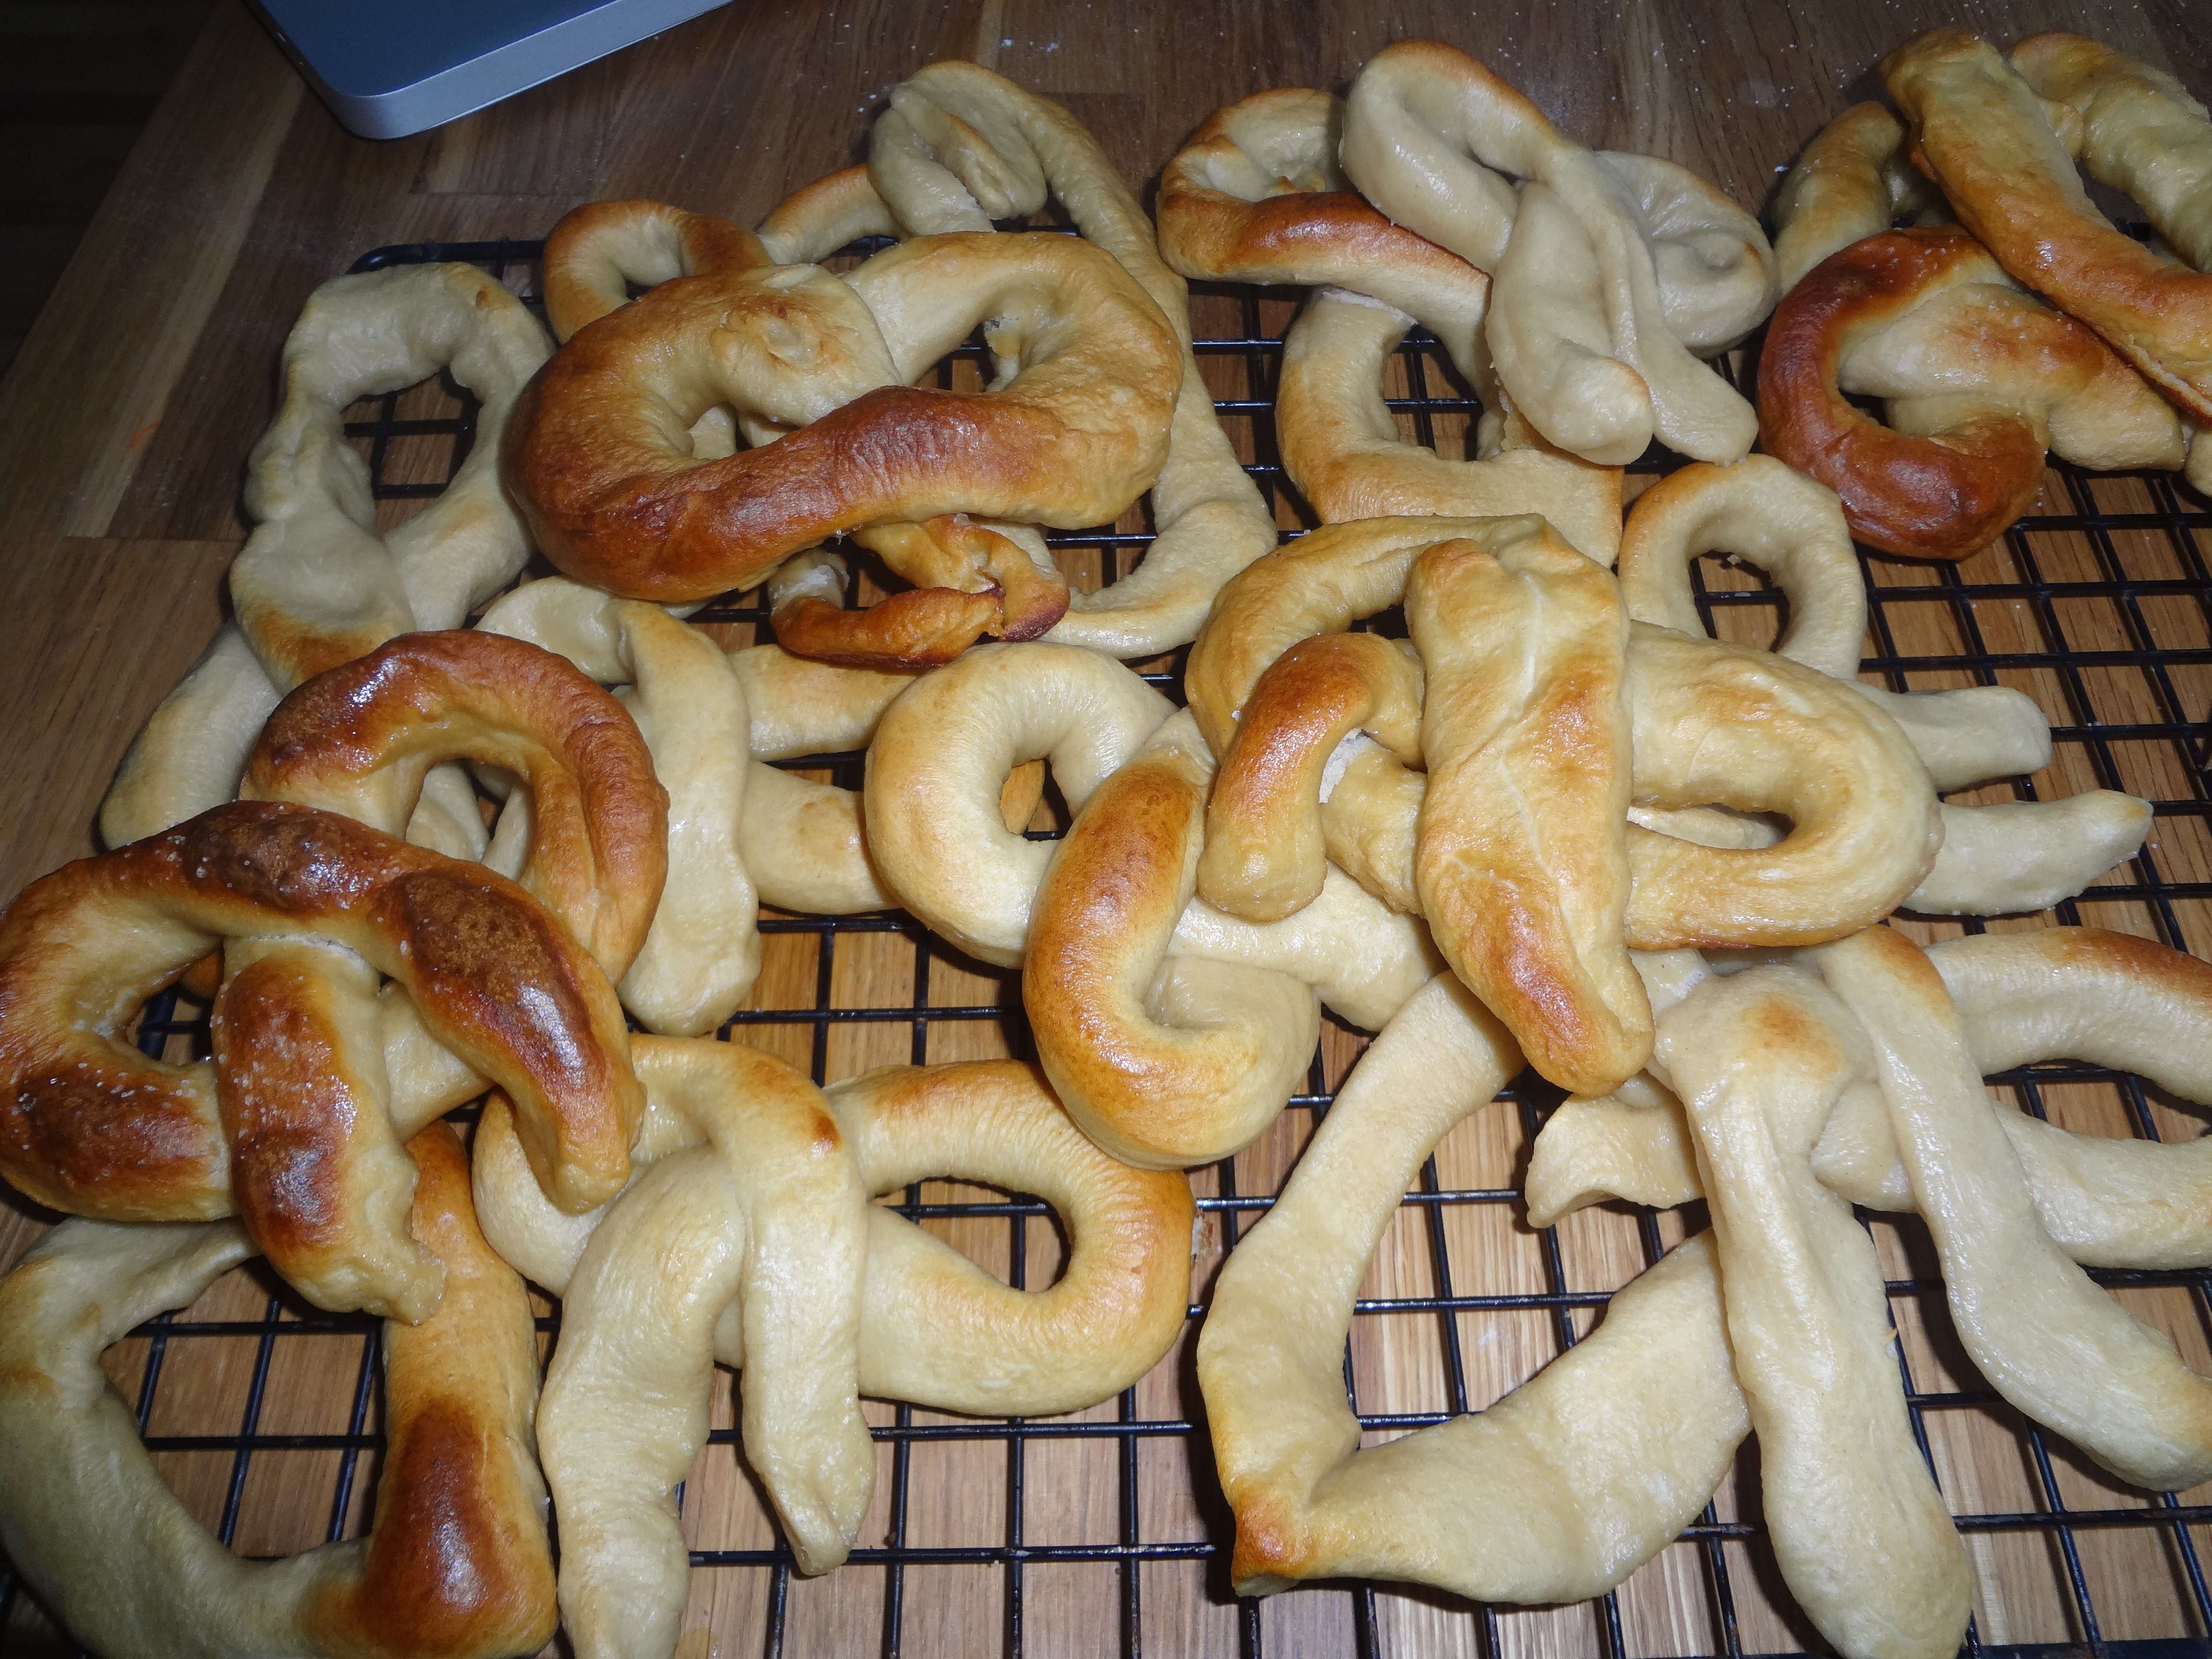
We had a snow day yesterday and since we’ve had so many snow days this winter I’m running out of things to do with the kids….we’ve baked, cooked, crafted, watched movies, played in the snow….and today we made homemade soft pretzels!  YUMMY!  They are a bit time consuming, but a perfect thing to do on a snow day!   It’s like playing with edible playdoh…..so we are crafting and eating at the same time!  BONUS!!!   And to up the ante even more…..for anyone on weight watchers or watching their weight…..these little gems are only 1 point each and delicious!  Get your littles involved too….mine love making different shapes!  We made hearts, figure 8s (or infinity symbols) and of course pretzel shapes!   We were feeling extra fun today…so we made a double batch!  

Soft Pretzels

1/8 cup hot water

1 package active dry yeast

1 1/3 warm water

1/3 cup brown sugar

4+ cups flour

Coarse kosher salt

Baking soda

Butter or shortening (to generously grease cookie sheets)

******************************************

In a large bowl mix together hot water and yeast until the yeast dissolves.  Stir in the warm water and brown sugar and mix until the brown sugar dissolves.

Slowly add 4 cups of flour, stirring constantly. Continue stirring until the mixture is smooth and does not stick to the sides of the bowl.

Lightly flour counter. Dip your hands into extra flour. Knead the dough until it is stretchy and smooth. (Push it down and away from you with the palms of your hands, turning the dough as you work)

Line cookie sheets with foil and generously with butter or shortening. Sprinkle greased cookie sheet(s) with kosher salt. Preheat oven to 475°. (It is very important that you grease the cookie sheets very well)

Using liquid measuring cup fill a large saucepan at least 1/2 full of water. For each 1 cup of water, add 1 tbsp baking soda.

Divide the dough into equal sized pieces.

 Roll the dough into a rope 14″ long and as thick as your thumb. Bend the dough into a U shape. (if you have trouble rolling the dough into a rope slightly wet your hands and try again).

 Cross one end of the rope over the other one. The ropes should cross about three inches from the tips.

OR form into any shape you want!

Twist the crossed ends, making a full turn. Fold the ends back, towards the middle of the U.

Open the ends slightly to form a pretzel shape. Press the ends into the dough firmly.

Bring water in saucepan to a gentle boil (not too many bubbles) Use pancake turner or a scoop & drain to lower each pretzel into the saucepan. Count slowly to 30. Then lift the pretzel onto the greased and salted cookie sheet (shaking off excess water back into the saucepan). Repeat until all the pretzels are done.

Sprinkle some kosher salt on top of the pretzels and put them in preheated oven.

Bake for 8 minutes or until the pretzels are golden.

**If you have a KA mixer, you can do all of this in there, and skip the kneading part. It makes things much easier! I used the mixer thing to mix it all then the hook to knead it all!!!!

ENJOY!!!

DSC01457

DSC01459

~gianna~

Buffalo Wings

I tried to find some recipes that were local to the 2 Super Bowl teams for this year….Denver and Seattle.  I couldn’t find any recipes that stood out to me for either region…in fact I couldn’t even find a good base food to even come up with a recipe.  Salmon and other seafood and some fresh fruit for Seattle, none of which screamed FOOTBALL to me!  And Denver…..3 WORDS….Rocky Mountain Oysters.  Not touching that one, literally or figuratively.   🙂  If you don’t know what they are…….look it up!

So let’s stick with Buffalo Wings…now that screams FOOTBALL!!!!

This is a very simple buffalo wing recipe and it’s delicious if you like a more crispy, not wet wing.  I tend to like them better this way….so if you do too, give them a shot!   Serve them up at your Super Bowl party with some blue cheese dressing and celery and enjoy!

Buffalo Wings

2 pounds of wings (separated at joint)

1/2 cup Hot Sauce (any kind you like..I used good ole Franks)

6 TBSP butter

Blue cheese dressing

Celery sticks

salt and pepper to taste

Preheat oven to 400°

Place wings on a foil lined baking sheet.  Make sure to leave space between wings and use 2 baking sheets if needed. Salt and pepper wings to taste.

Cook for 30-40 minutes until cooked thru.

In a small pot ob low/medium heat whisk together butter and hot sauce.

Remove chicken from oven and toss in butter/hot sauce mixture.

Put coated wings back on baking sheet and in oven for another 5-10 minutes.

Image 2

Remove and serve with blue cheese dressing and celery.

Image 1

ENJOY!

~gianna~

Ultimate Pretzel Crusted Peanut Butter Brownies

Yup, you read that right!  Someone posted this recipe on my message board, and as soon as I saw “pretzel”, “peanut butter” and “brownie” in the same title — DONE!  While I’m not a huge chocolate person (shocking, right?)…..once you mix it with peanut butter, I become a HUGE fan of chocolate!  But that’s it….only if it’s with peanut butter.  

I’d been cooking ALL.  DAY.  LONG and I was tired….but I knew once dinner was over and the kitchen was clean, I could sink my teeth into one of these!

The recipe came from HERE.  I followed the recipe exact, because I had gotten all the ingredients this time!  And they did NOT disappoint!  I had one, but no one else in the family has.  Olivia was in bed by 7:15, not felling well…Ava got punished because she didn’t eat dinner (can’t have your pudding, if you don’t eat your meat) and Joe is asleep on the couch.  But now that I’ve cut them up…once the smell makes its way to the living room….he’ll be up!   For now though……I may just have another one!  They are a little rich and sweet…so cut them into smaller “brownie pieces” unless you like rich and sweet.

There is NOTHING healthy about these….so if you are dieting or watching what you eat…LEAVE NOW before you see the picture!  

If you are anti-diet, feast your eyes on these……….

Image 2

(that is heaps of peanut butter from the peanut butter cups).

 OK….I won’t waste any more time…here’s the recipe!


Ingredients:

2 1/2 cups crushed butter snap pretzels

1 cup melted butter

5 TBSP sugar

Peanut Butter Cookie Mix (+ ingredients the mix calls for)

Brownie Mix (+ ingredients the mix calls for)

Snack size Reece’s Peanut Butter Cups (24)


1.  Crush the pretzels in a food processor (or however you’d like to crush them).  Don’t crush to dust….make sure there are small pieces still in the mix.  

Mix with melted butter and sugar.

Press lightly into a greased 13×9 pan.

Set aside

 2.  Make cookie dough according to package.  Lightly press cookie dough evenly on top of pretzel crust.

 3.  Unwrap 24 Reece’s Peanut Butter Cups and layer them on top of cookie dough.

Image 5

4.  Make brownie mix according to package and pour evenly over Peanut Butter Cups.

Image 4

5.  Bake at 350 degrees for 40-45 minutes.

6. Remove, Cook and ENJOY!

Image 3

My good camera is broken (sad face) so these pictures are from my phone…and do not do it’s justice!

~gianna~

Death By Chocolate

Here is a recipe that my Mom always made for special occasions when we were kids….I especially remember it on New Year’s Eve!  Her recipe was a little different because she used Heath Bars……and with all the nut allergies nowadays I stick with Kit Kats.  She also used to put Kahlua in her cake mix to give it a little extra kick, I do not.  You definitely can add the Kahlua and swap the Heath for the Kit Kats! But no matter how you do it…..you will be sure to have a crowd pleasing dessert!!!  It’s a very simple recipe, that really takes no time at all…..As long as you have the ingredients in your kitchen. You can make it for a large crowd, for a holiday, for a BBQ, or just for 2 people to share on Valentine’s Day (and the week following with leftovers).  I made this for New Year’s Eve and even though a lot of it went…I was so excited to have leftovers!!!!   It’s even better after it sits in the fridge for a few days!   YUM!!!!

Death By Chocolate 

1 box of Chocolate Cake Mix (I use Chocolate Fudge) 
1 box of Chocolate Mousse Mix 
1 large container of Cool Whip — remove from freezer and into fridge for 30 minutes-1hour before you make dessert. 
1 package of 6 — Kit Kat Bars 

 Follow directions on the cake mix box..and make your cake. 
Cool and then wrap the entire cake in foil and put in the freezer for a few hours. 
Make mousse by following the box..let cool in fridge for a few hours. 
In a food processor or by hand smash candy bars into pieces. 

When ready to make the dessert, get a large clear bowl. 
Crumble 1/2 of the cake into bottom of bowl. 
Next layer 1/2 of the mousse on top.
Next layer 1/2 of the Cool Whip. 
Sprinkle 1/2 of the candy pieces. 
Next layer the rest of cake crumbled.
Layer rest of mousse. 
Layer rest of Cool Whip. 
Finish off with candy pieces!

Image

~gianna~

Snickers Dip

I love dip, I love to dip things, I love everything about dip…so when I stumbled upon this recipe for a DESSERT dip…that included some of my favorite things, I had to try it!


I actually made this for a party and everyone loved it!!!!    I had made the dip earlier in the day and decorated with the pretzels and put it in the fridge until we were ready to leave.  The decorative pretzels were very soggy when it came time to serve it.  So I’d either warn your taste testers or not put the pretzels in the bowl until right before you are going to serve!


It was so easy and got rave reviews!!!


Snickers Dip


Ingredients:


2 packages of cream cheese, softened (8 oz. each)

1 container of Cool Whip

1/4 cup brown sugar

6 Snickers bars, chopped


Mix all ingredients together in a stand mixer.   Chill overnight.  Serve with pretzels, graham crackers or anything else you’d like to dip!!!!  I added some chocolate shavings on top too!

ENJOY!!

IMG_1632

IMG_1626


~gianna~

S’more Pizza

I needed a dessert for our Super Bowl Party (I know…that was a month ago) and stumbled upon THIS  recipe from Guy Fieri @ The Food Network in my search.  While it looked delicious,  my husband nor Olivia were sold on the pizza dough crust.  My husband (believe it or not) said, “Wouldn’t that be so much better without the pizza dough….maybe you should use chocolate chip cookie dough instead!”   I thought it sounded perfect either way, but had to keep the troops happy….

I did think it’d be way too chocolaty and sweet for my taste buds, so I convinced them to let me do sugar cookie crust instead!   Everyone agreed and we had our Super Bowl party dessert!    While it was very sweet, even with the sugar cookie crust, it was amazing for any sweet tooth!  Make this SOON!!!!  Next time I make this I am going to try it with the pizza dough!

IMG_0096


1 batch of sugar cookie dough.  Homemade or store-bought.

2 TBSP unsalted butter

1/2 sleeve graham crackers (broken into crumbs)

1/4 tsp salt

2 cups mini marshmallows

3 large Hershey chocolate bars — broken into 1/4 inch pieces


Preheat oven to 400 degrees.

Make cookie dough.

Roll and push into 12″ round pizza pan )making sure you get it as thin as you can without breaking through.

Bake for 10-12 minutes or until golden brown.

While it’s cooking,  melt butter in a skillet and add graham crackers.  Cook for 3 minutes.

Remove from heat and set aside.

 When cookie crust is done remove from oven and scatter marshmallows and chocolate pieces. 

Return to oven for approx. 5 minutes or until marshmallows are brown and toasted.

Remove and top with graham cracker crumbs evenly over pizza.

Let sit for a few minutes, slice and serve.

 ENJOY!!!!

IMG_0094

~gianna~

Red Velvet Cream Cheese Brownies

Here is a post from a few years ago when the NY Giants were in the Super Bowl…it was worth carrying over here for a great super bowl dessert to bring to a party or serve to your family.  Well…it’s really a good dessert for anytime!

I finally had the kitchen all cleaned up from dinner last night, when I got a text from a friend of mine saying her daughter was sick, and my oldest couldn’t go over and play today.  I knew I’d have a disappointed 6 year old after school, because she was so excited to go to her friend’s house.   I decided we’d have a fun afternoon and night at home….early dinner, a board game or 2 and a family movie…..and obviously we’d need to bake a yummy dessert!   But what should we bake???  We did cookies a few days ago and they didn’t turn out how I’d planned…..but we needed something different!  I went through a bunch of blogs I follow and a bunch of recipes I have saved (for rainy days….or when I have a sad kid on my hands that needs cheering up), but nothing was jumping at me!   I wondered over to Fake Ginger (the genius behind the pretzel bowls) to see what kind of yummy desserty recipes she might have (I hadn’t gotten a chance to browse her recipes yet) and found one that JUMPED!   And boy did it jump!

Anyone who knows me, knows I LOVE Red Velvet anything…..cake, cupcakes, cake balls, alcoholic beverages…you name it, I want it!   And it’s funny because I DON’T like chocolate (for shame, I know!) And red velvet is chocolate cake with red food coloring…well more or less.  Aside from the cocoa powder — I don’t see the similarity (or taste it).   I also am slightly obsessed with cream cheese…and cream cheese frosting is one of my most favoritest things on Earth.  So this recipe JUMPED!  And my girls and I jumped right on it!    I also think it would be a fun dessert to make for a Super Bowl party!  IMG_0062

It was very simple, and my kids enjoyed making them with me.  It helps that red is Olivia’s color and Ava’s 2nd favorite color!   They also enjoyed swirling the batter with a toothpick!

These were very delicious, and looked beautiful!  A bit on the rich side, but red velvet cake is known to be more rich and heavy…so that was fine with me!   It’s amazing how this recipe makes the red velvet much more brownie-like. , though!    My husband (the sweetest tooth in the house) who we had to hide them from……really liked them, once we let him get his hands on them!  A definite recipe we will keep for a long time!

Red Velvet Cream Cheese Brownies

(Fake Ginger)

 Ingredients

For brownie layer

1/2 cup butter (1 stick)

1 cup sugar

1 tsp vanilla

1/4 cup cocoa powder

pinch of salt

1 Tbsp red food coloring (I used liquid, probably should’ve used gel or powder like the originator said).

1 tsp.  white distilled vinegar

2 eggs

3/4 cups flour


For cream cheese layer

8 oz. cream cheese — softened

1/4 cup sugar

1 egg

1/8 tsp vanilla


Instructions

Preheat oven to 350.  Line an 8×8 baking pan with parchment paper or butter generously.  

Melt butter. 

In large bowl add butter, sugar, vanilla, cocoa powder, salt, food coloring and vinegar and stir to combine everything.   

In separate bowl, whisk eggs.  

Add eggs to the butter mixture slowly and whisk constantly.

Fold the flower into the mixture, being careful not to over mix.

Reserve 1/4 cup of mixture.

Pour remaining batter into prepared pan.


In stand mixer beat cream cheese until soft.  

Add sugar, egg and vanilla; beat until combined.

Gently spread the cream cheese mixture over the brownie batter in pan.

Dollop the remaining batter (1/4 cup you reserved) onto the cream cheese layer.  

Drag a toothpick or knife through the batter to create swirls.

Bake for 25-30 minutes or until cream cheese is set. 

Let cool completely on wire rack before cutting.

The flag was added for a Superbowl Party when the Giants were in it a few years ago!

The flag was added for a Superbowl Party when the Giants were in it a few years ago!


Fajitas

Fajitas are one of my favorite things in the world……I can’t even imagine anyone NOT liking them.  Cheese, peppers, sour cream, cheese, chicken, cheese, guacamole….CHEESE!!!!  And I  sometimes even use the full fat version of everything!!!!  Mmmmm….I love fajitas.

So while I have never met a chicken or shrimp fajita I didn’t like…I’ve also never met anyone who doesn’t like these fajitas….welllllll..except my sister-in-law, Ann…who slathered hers in ketchup when I made them for her and my brother in law!  I don’t think I ever made her fajitas again……and I probably never will!  🙂  Her loss!

These fajitas are so easy and so delicious, thanks to one special ingredient…the marinade!  It’s all in the marinade  and I’m not ashamed to admit it!  Someone perfected a perfect (in my opinion) fajita marinade and WOW it’s great!

marinade

When I make this I usually make extra so we have leftovers for lunch or another dinner.

So I don’t have many measurements and I sometimes substitute shrimp and it’s equally delicious!  I also love peppers and onions, so I go heavy on those!

Chicken Fajitas  (or shrimp)

Boneless, skinless chicken breasts (washed, trimmed and sliced into bite sized pieces)

OR

Uncooked shrimp (devined and shell removed)

World Harbors Fajita marinade (I usually use 1/4 – half a bottle)

Olive oil

Red bell peppers  (washed, cleaned and cut into slices)

Green peppers (washed, cleaned and cut into slices)

Vidalia onion (cut in half and then sliced)

Olive oil

Shredded Mexican Blend Cheese  (LOTS!)

Sour Cream

Guacamole or Avocado

Salsa

Clean and cut chicken.

In a large pan add chicken and Fajita marinade and toss and cook until it’s done.  Usually takes about 10 minutes.

Wash and slice peppers and onions into strips.

In another large frying pan add peppers, onions and olive oil.  Just enough for sauteing.   And cook those until done.  “Done” for the peppers and onions is however you like them.  I like mine cooked until still slightly crunchy. 

Heat tortilla shells (follow directions on bag)

fajita1

fajita2

Fill (or stuff…like I do) your tortillas with all the yummy toppings, roll it up and ENJOY!!!!

fajita3

~gianna~

7 Layer Taco Dip

This is a favorite of mine and it’s something that I have been making for years and years….I think the first time I brought it to a party I was actually in High School……sooooo it’s OLD!   But it’s something that never disappoints..well except this one time when I brought it to a party and some drunk friends decided to put it in the oven and cook it……..people still ate it, but it wasn’t very tasty.   PLEASE…DO NOT HEAT THIS DIP….TRUST ME!  The nice thing about this dip is that you can make it however you want…..and add or subtract ingredients….or add extra or less of others…..Just make it to your liking.  There really aren’t measurements to it!  This is perfect for any time of year……and a great dip for football games!

7 Layer Taco Dip


Can of refried beans

Container of Guacamole (or make your own, which I often do)

Container of Sour Cream

Package of taco seasoning

Tomatoes — seeds removed and chopped

Olives — sliced

Shredded Mexican blend cheese

Scallions

Tortilla chips (I like the bite sized ones….they are perfectly sized for dipping and enjoying!)


1.  Spread refried beans over a large circle serving platter.  I try to use one with a small lip.

2.  Spread guacamole on top of beans.

3.  Mix sour cream and taco seasoning in bowl and then spread over guacamole.

4.  Layer chopped tomatoes on top of the sour cream mixture.

5.  Spread sliced olives all around.

6.  Sprinkle cheese on top of the tomatoes and olives.

7.  Sprinkle chopped scallions over the entire dip.

8.  DO NOT COOK  🙂

9.  Serve with chips

10.  ENJOY!!!!

taco dip

~gianna~

Sausage & Peppers

This is always a crowd pleaser because it can be served as a main dish during a party or it can be served as an appetizer.  It can be served on bread or just in a plate and some do it over pasta.   I have become a huge fan of turkey sausage, so feel free to use that instead…..AND if you like a little spice in your life you may opt for hot sausage as opposed to sweet.    So as you can see, it’s very versatile.  It easy to make for a large group too.  My Mom used to make it all the time when she had large amounts of people over.   This recipe is what I usually make for my family of 4 (with a bit leftover),  so if you are making it for more people make sure you make more.   In the summer I usually  throw them on the grill for the last 10-15 minutes just to give them that nice grill taste, but here in Jersey it’s way too cold to be grilling when it;s just as easy and delicious to keep them in the oven.

Sausage & Peppers

1 package of sweet Italian sausage

1 red bell pepper

1 green pepper

1 vidalia onion

Olive oil

Salt

Pepper

Rolls, baguettes or a French loaf of bread

Preheat oven to 375.

Lightly oil the bottom of a 8×8 Pyrex dish.

With a fork pierce a few holes in each sausage link and lay them in Pyrex.

Cook for approx. 30 minutes.  Half way through flip them over.

At 30 minutes remove from oven and slice the links open (butterfly them) and return to oven.  Cook for about 15-20 more minutes until no longer pink inside.

OR

Slice links and put them on a preheated medium heat grill and cook for about 15 minutes until no longer pink.

While  sausage is cooking…

Slice peppers and onion and stir fry on stove top in olive oil  ans salt and pepper (to taste) until cooked, but still slightly crispy.  I like mine on the harder side, but if you like yours softer you can cook them longer.

Once sausage and peppers and onions are fully cooked serve both on bread of your choice.  I like to eat mine with ketchup, but you can also use your favorite marinara sauce or eat it plain!

 ENJOY!

IMG_0701

~gianna~ 

Previous Older Entries

I'm just starting out; leave me a comment or a like :)

They Like It...

  • None
REAL MOMS EAT PIZZA

Keepin it Real since February 18, 2014

Welcome to the world of NECCO!

News, crafts, recipes and more from the New England Confectionery Company (NECCO).

Pies Pizza & Pasta

Simple tasty convienient food done on a budget please leave any comments on the recipie you have tried or any changes or ideas you have so I can try them and add a post with the changes.

Chocolate, Chicken & Coconuts

"Every time you eat or drink, you're either feeding disease or fighting it"

Cooking with Mr Fitz

A collection of food journeys & taste-full experiences

Gusface Grillah

All things BBQ, bacon, dude food & beer.

ice cream magazine

................... for lovers of ice cream. Your free on line magazine for sweet frozen treats. Recipes, inspiration, artisanal ideas for your delectation.

The Daily Post

The Art and Craft of Blogging