Double Crunch Honey Garlic Chicken

One day I was looking for a new chicken recipe and found  this one during a google search.     I had all the ingredients needed (as I’m sure most people do) and decided to give it a shot!  I knew it was something everyone would like in my house and it sounded really good!  It was delicious!!!  The chicken had the perfect combo of crunch on the outside and tenderness on the inside and it was very flavorful and easy to make!    It was so good I even made it once using boneless pork chops!  I liked the chicken better for the tenderness of the meat, but the pork was good too!

Double Crunch Honey Garlic Chicken

4 large boneless skinless chicken breasts (halved into 8 thinner pieces)
2 cups flour
4 tsp salt
4 tsp black pepper
3 tbsp ground ginger
1 tbsp freshly ground nutmeg
2 tsp ground thyme
2 tsp ground sage
2 tbsp paprika
1 tsp cayenne pepper
4 eggs
8 tbsp water
2 tbsp olive oil
3-4 cloves minced garlic
1 cup honey
1/4 cup soy sauce (low sodium soy sauce is best)
1 tsp ground black pepper
 canola oil for frying

Slice the breasts by placing them flat on a cutting board and using a very sharp knife to slice them into halves horizontally.

Sift together the flour, salt, black pepper, ground ginger, nutmeg, thyme, sage paprika and cayenne pepper.

Whisk together the eggs and water in a separate bowl.

Season the chicken breasts with salt and pepper, then dip in the flour and spice mixture.

Then dip into the egg mixture and then a final time into the flour and spice mix, pressing the mix into the meat to get good contact.

Heat a skillet on the stove with about a half inch of canola oil covering the bottom.

NOTE FROM ORIGINAL RECIPE:  You will want to carefully regulate the temperature here so that the chicken does not brown too quickly. The thinness of the breast meat practically guarantees that it will be fully cooked by the time the outside is browned. I find just below medium heat works well. I use a burner setting of about 4 1/2 out of 10 on the dial and fry them gently for about 4 or 5 minutes per side until golden brown and crispy.

Drain chicken on wire rack for a few minutes and then dip chicken into the Honey Garlic Sauce. 

 Honey Garlic Sauce:
In a medium saucepan add olive oil and minced garlic. Cook over medium heat to soften the garlic but do not let it brown.
Add the honey, soy sauce and black pepper.
Simmer together for 5-10 minutes, remove from heat and allow to cool for a few minutes. Watch this carefully as it simmers because it can foam up over the pot very easily.

ENJOY!

Double Crunch Honey Chicken

~gianna~

Maple Syrup Salmon

I first stumbled upon this recipe a few years ago on a message board I frequent… And ever since I found it…….I make it very often!

Whenever we are with friends or family eating….I hear a lot of “Your kids eat that?”  or “How do you get your kids to eat…….” and honestly…..I find recipes that are “kid friendly”, and when they aren’t….I make my kids something different, but they have to try it!  Usually when Olivia tries something…she either likes it or LOVES it….but once in awhile she won’t, and usually it’s something I wouldn’t have eaten as a child either (so I can’t blame her)!   Ava will pretty much say “I don’t like this!”  but she eats it anyway!  🙂  NOT THIS RECIPE THOUGH….both of my girls LOVE this salmon recipe….and when you make you will know why!  It’s so simple, takes hardly any time….and the combo of maple syrup and soy sauce make for a very yummy glaze!  I hope you enjoy it as much as we do!

Maple Syrup Salmon

1/4 cup maple syrup 

2 tablespoons soy sauce 

1 clove garlic, minced 

1/4 teaspoon garlic salt 

1/8 teaspoon ground black pepper 

1 pound salmon (skin removed)

••••••••••••••••••••••••••••••••••••••••••••••••••••••••••••••••••••••••••••••••••••••••••••••••••

In a small bowl, mix the maple syrup, soy sauce, garlic, garlic salt, and pepper. 

Place salmon in a shallow baking dish, and coat with the maple syrup mixture. Cover the dish, and marinate salmon in the refrigerator 30 minutes, turning once. 

Preheat oven to 400° F (200° C). 

Place the baking dish in the preheated oven, and bake salmon 20 minutes, or until easily flaked with a fork. 

ENJOY!

maplesyrupsalmon~gianna~
  

Blackened Shrimp Po Boy

I normally wouldn’t do back to back recipes (shrimp/shrimp)…..but this deserved to be posted RIGHT NOW.   We don’t eat shrimp back to back either!

So last week my best friend and I had one of our girl’s night dinners….just her and I!  We try to do it a few times a month because even though we talk on the phone multiple times a day…(normal, right?) when dodgeball isn’t in season we don’t see each other often enough!   Thankfully dodgeball starts again next week and I get to see her once a week for the next few months…..YAY!!!    Anyway……enough about her…let’s move on…..

We decided on a local restaurant that we’ve been to before, but really like the atmosphere!  For the locals…Urban Table in Morristown…..PLUGGIN IT!  It’s great food, great atmosphere, and the prices aren’t crazy!   We had already decided on what we were getting…..cheesesteak spring rolls and a grilled chicken chopped salad to share……ooooor so we thought!!!    The waiter came over and read the specials and he barely uttered the entire list when Nil (BFFs name) and I looked over at each other and just knew…..HE IS HOT!!!!  Nooo,.just kidding……..MEAL CHANGE!  We were forgoing the salad….natch….and ordering up the Blackened Shrimp Po Boy with the Cheesesteak Spring Rolls!   We deserved it after a 12 day plank challenge we had just about finished anyway!

The second our meal arrived…..and we laid eyes on the Po Boy……we just knew!  And (Po) Boy,  were we right!  It was one of the most delicious things I had eaten in a long time!  I was really upset we decided to share…I wanted it all to myself!!!    Especially knowing I couldn’t just go back another day for it….because it was a special!

Po Gianna!

The combo of blackened shrimp and the pretzel bread….YUM…add in some pickles and lettuce and tomato….YUMMMMMMY!

So I decide I would be making my own very soon…and here I am less than a week later…recreating this sandwich.  And I get the whole thing to myself!!!!!!   Love ya, Nil….but mine…all mine!  🙂    Super easy, Super delicious!!!  MUST.  TRY.  SOON!!!


Blackened Shrimp Po Boys on Pretzel Rolls

4 Sandwiches

Shrimp — cleaned, peeled & deveined — I made enough for each sandwich to have 6-7 medium shrimp

Blackened Redfish Magic Seasoning (or any similar seasoning)

1/2 Stick of Butter

Pretzel Rolls (you can use any rolls…but I promise if you can find these..DO IT!)

Shredded Lettuce

Sliced Pickles

Sliced Tomato

Light Mayo

*******************************************************************

Clean peel & devein shrimp.

Place in large ziplock with enough seasoning to coat all shrimp.

DSC01583

Place in fridge for about 30 minutes – 1 hour.

Shred lettuce, slice pickles, slice tomato, prepare rolls (just scoop some of the inside of the roll out to make a nice hole).

Melt butter in large skillet.

Place shrimp in single layer and cook about 4 minutes, flip and cook another 3-4 minutes.  Remove from heat.

DSC01578

Prepare your sandwich…….

Mayo on roll, shredded lettuce, tomato and pickles on one side…..mayo and shrimp on the other.

DSC01579

Bring both sides together and ENJOY..I know you will!!!!!

DSC01582


~gianna~

Honey Lime Shrimp

I stumbled upon this recipe on Pinterest when I was looking for a new shrimp recipe.  This one sounded perfect and something that I knew the whole family would enjoy!  We love shrimp in our house and cook it a lo,t so finding new recipes is always fun!   This recipe is a perfect combo of sweet and savory…with a bit of a kick.  Use the red pepper flakes to your liking.  My kids don’t love too much spice, so I didn’t use much….but if you like spice, add more!  I served it with rice and salad and it was amazing! The shrimp get a little crunch to them too, which makes the flavor almost explode in your mouth!  YUM!

Honey Lime Shrimp

1 pound large shrimp, peeled and deveined

1/2 cup olive oil

4 T honey

juice of one lime

zest of one small lime, or half a large lime

4 cloves garlic, smashed

1 tsp kosher salt

1/4 tsp black pepper

red pepper flakes

***********************************************************************

Combine all the  ingredients in a ziplock bag.

Add shrimp

Put in fridge and marinate for 30-60 minutes.  Toss in bag a few times to get them well coated.

Remove from fridge approx 10 minutes prior to cooking.

Heat a large skillet over medium-high heat.

Add your shrimp to the pan in a single layer, making sure they are not too crowded; you can always cook them in more than one batch.

Let them cook on one side for about a minute, until they curl up and start to turn pink. Flip them over, and cook for another 30 seconds or so, until the shrimp are opaque. Remove from the pan, and serve immediately over rice!

Enjoy!

Image

~gianna~

Stuffed Peppers

Stuffed peppers are one of my most favorite foods.  It has every component for a complete meal too and uses ingredients I always have on hand!  My family doesn’t love them as much as I do…but they will eat them.  The girls like the filling, so it works!  They are very, very simple and so delicious.  I LOVE red peppers and don’t love green….so I usually opt for the red, but will use green too.  It’s really just a personal preference!

This is one recipe, I have other recipes too for stuffed peppers….stay tuned for more!

Stuffed Peppers

4 large red or green peppers (cut tops off and clean inside seeds out)

2 cups of rice (cooked)

1 lb. ground turkey

Diced Vadalia Onion (about 1/2 c)

2 gloves of garlic (minced)

Oil

1 can diced tomatoes

1 small can of tomato sauce 

Breadcrumbs

Shredded Cheese — I used cheddar but you can use anything.

8×8 (or 9×9) Baking dish

********************************************************************

In a large pan heat oil and add garlic. Cook for 30 seconds. Add onion and cook until translucent. Add turkey and cook until browned. Add drained can of tomoatoes and cook for about 5 minutes. Add tomato sauce and cook for about 5 minutes.

Remove from heat and add to the mixture. Add handful of cheese and mix well. Stuff the peppers with mixture.  You can either half the peppers (like I did this time) or keep them whole and standing in the pan.  

Image 7

Top the peppers with a little more cheese and breadcrumbs.

Image 8

Cook for 30 minutes at 400 degrees.

Enjoy!

Image 9

~gianna~

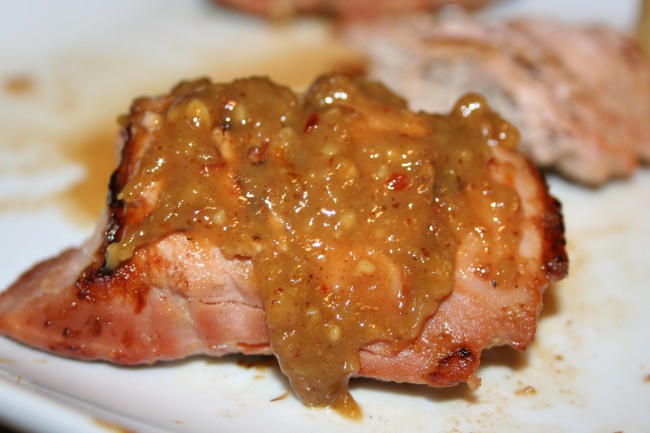
Sweet and Sassy Pork Tenderloin

As you know…..I’m not a huge meat eater, with the exception of chicken, turkey and seafood….the only other meat I like is pork!   Well NOT all pork, but some!   This pork tenderloin recipe is to die for! When I say it’s delicious, it’s an understatement. It’s so tender and has the perfect amount of sweet and spice (sassy)!  I got the recipe from my friend, Jen!  Thanks, Jen!!!  🙂    I know here in Jersey it’s hard to use a grill right now since most grills are under 2 feet of snow, but if you have access to your grill….or you can ice pick your way to it……DO IT!

The key is marinating it for long enough and cooking it perfectly. I can promise you, you will add this to the rotation. As for my kids….they LOVE it! 

 I always double or triple the marinade recipe so there is enough sauce to smother and dip!  You should definitely do the same!  This is also a perfect dinner idea if you are having company….well..because it’s that good and you will get rave reviews!  PROMISE!!!

SWEET AND SASSY PORK TENDERLOIN 

2 pounds pork tenderloin 

4 tablespoons brown sugar 

2 tablespoon Worcestershire sauce 

4 tablespoons apple cider vinegar 

2 tablespoon Spicy Brown Mustard 

2 cloves garlic, minced 

1 teaspoon crushed red pepper flakes…if you want it more sassy, add more! 

2 teaspoon prepared horseradish 

Cut tenderloin into 1-1.5 inch thick pieces..and place in large bowl. I got about 8 pieces out of mine. 

Stir together sugar, Worcestershire sauce, vinegar, mustard, garlic, red pepper flakes, and horseradish in bowl, until blended and pour over pork. 

Let marinate for at least 2 hours..I do it all day! 

Place the meat onto preheated grill (med/high heat). 

Grill until no longer pink in the center, approx 8 minutes per side. 

When finished, place pork on a plate, and allow to rest for 5 minutes. 

While meat is cooking bring the marinade to a boil on the stove, and simmer over medium heat, and stir until smooth. Pour sauce over sliced tenderloin to serve.

 Enjoy!!

Image

~gianna~

Red Velvet Fudge Pie

As I’ve discussed previously, red velvet is my favorite dessert.  I love anything red velvet….so when I got this list of 30 red velvet recipes, I was ready to try them all!     I had already tried the Red Velvet Oreo Brownies and got rave reviews from everyone that tried them…but this one I just knew would be another crowd pleaser.     The perfect occasion to try it was on Valentine’s Day because well….it was Valentine’s Day, the day of everything chocolate and LOVE ❤  but also because my family would be celebrating my Dad’s birthday on Valentine’s Day this year.  He was going away for his actual birthday (yesterday).   He actually requested  “NO RED VELVET THIS YEAR!” and “SOMETHING MORE PLAIN!”…..so I did make him a regular boxed cake with cream cheese frosting.  I know…GASP…boxed cake.  but given we’d been snowed in for days and cooking and baking for most of them….I needed the comfort and ease of a plain white cake with cream cheese frosting.  Plus I also knew I’d be making the pie as a second dessert and it’d take some time!    HOLY COW!!!!  This pie was unreal!!!  Like don’t wait until next Valentine’s Day to make it……you need to make it now!  Like AS.  SOON.  AS.  POSSIBLE!  It’s that good!  Everyone loved it, including my Dad….who requested NO RED VELVET.  He actually went for a piece of the pie first!      It was simple and delicious.  I can’t wait to make another one…SOON!

The recipe came from HERE .  I follow her Facebook page and she always has some really amazing desserts and creative, fun things!  Check her out!!!

Red Velvet Fudge Pie

**The amount of cake batter makes 2 pies, but I only used half the batter and made 1 pie.  Saved the rest for a plain cake. BUT I used all the fudge topping!

Ingredients
1 box red velvet cake mix (3 eggs, 1/3 cup vegetable oil) 

1/2 cup butter

12 ounces mini  chocolate chips

1 14-ounce can sweetened condensed milk

2 refrigerated pie crusts (or homemade, your choice)

********************************************************************

Preheat oven to 350°

Unroll pie crust into pie pan.

Prepare cake mix according to instructions on back.

 Mix well and pour into refrigerated pie crust in pan.

Bake for 30-35 minutes or until crusts are golden brown and toothpick inserted in center comes out clean.

If crusts begin to brown before pie is done, cover loosely with aluminum foil.

In medium saucepan, combine butter, 10 ounces of chocolate chips (reserve some for garnish) and sweetened condensed milk.

Stir (medium heat) until smooth and pour over pies.

Garnish with extra chocolate chips!

Let cool completely.

ENJOY!!

Image 3

AMAZING!!!

Image

I didn’t let it cool long enough, which is why the chips melted, but it didn’t matter….it was still unreal!

~gianna~

Red Velvet Cake

Recently I had a discussion with my bestie about favorite desserts.   We were talking about if we were going to buy each other a dessert, for each other’s birthday….would we know what to get?   I guessed carrot cake or coconut cream pie for her…..and I was right AND she picked red velvet for me and she was correct!   Red velvet cake (well red velvet anything) is probably my most favorite dessert of all time.  Funny thing is I don’t like chocolate…and red velvet is cocoa based…..BUT it’s for sure my favorite!  I think when it’s paired with a cream cheese frosting….I’m in heaven!  Plus who doesn’t love that bright red cake/white frosting combo.  It’s just looks FUN!

And with Valentine’s Day right around the corner….I’ll be posting a bunch of red velvet/dessert recipes for the occasion!   Give them a try on your loved ones…..they will fall in love.

One of my all time favorite red velvet cake recipes comes from Bakerella.  Def check her out…. for all your baking favorites.  She’s truly amazing!  I’ve made her cake many times over the past few years and it’s always raved about!    I’ve made other recipes, but none are quite like hers……moist (I know…..I hate that word too) and delicious.  And her cream cheese frosting  will send you over the edge!

WOW your love this Valentine’s Day with this red velvet cake recipe!  ❤

Red Velvet Cake

2 1/2 cups all purpose flour
2 cups sugar
1 Tablespoon cocoa
1 teaspoon salt
1 teaspoon baking soda
2 eggs
1 1/2 cups oil
1 cup buttermilk
1 Tablespoon vinegar
1 teaspoon vanilla
2 oz. red food coloring

***********************************

Preheat oven to 350 degrees. 

Grease and flour two 8 inch cake pans. 

Lightly stir eggs in a medium bowl with a wire whisk. Add remaining liquid ingredients and stir together with whisk until blended. Set aside. 

Place all the dry ingredients in your mixing bowl and stir together really good with another wire whisk. 

Add wet ingredients to the dry ingredients and mix on medium-high for about a minute or until completely combined. 

Pour into cake pans and then drop the pans on the counter a few times to release any air bubbles. 

Bake for about 30 minutes or until a toothpick inserted comes out clean. 

After about ten minutes, remove from pans and cool completely on a wire rack. I also cover in plastic wrap while the cakes cool. 

Then make the frosting. 

Cream Cheese Frosting

8 oz. cream cheese, room temperature
1 cup butter, room temperature
1 teaspoon vanilla
6 cups confectioners’ sugar

*****************************************

Sift sugar and set aside. 

Beat cream cheese and butter on high until creamy. Add vanilla. 

Then, add the sugar in batches. Scrape down the sides in between each addition. 

And frost. 

ENJOY!!!!

red velvet

I can’t forget a shout out to my sister-in-law and my cousin  today!!!  HAPPY BIRTHDAY, GIRLS!!!  xoxoxo

~gianna~

It’s a Jersey Thing

In honor of New Jersey (YES…..It’s being played in New Jersey, NOT New York) hosting the Super Bowl tomorrow, I decided to post a recipe that’s popular here.  And just because everyone’s asking and talking about it……This Jersey Girl and JETS fan will be sporting my Seahawks shirt (#25)!!!  Go Seahawks!!!

This is a great thing to make after a night of drinking…so maybe Monday morning after the big game!  

Here in NJ we have one of the most delicious things you’ll ever lay your mouth on.  In North Jersey we call it taylor ham, egg and cheese in South Jersey they call it pork roll, egg and cheese.  It’s also popularly known as “TEC” because this is what is written on the wrapper after it’s wrapped up to go with your coffee, iced tea, 1/2 & 1/2 (known around the world as an Arnold Palmer, but in my parts a 1/2 & 1/2).  You can’t even get taylor ham/pork roll in many parts of the USA….shocking that some people have never had the pleasure of enjoying this NJ delicacy.

So what IS taylor ham and pork roll, you ask????   Well Taylor Ham is actually a brand of pork roll…..just like Q-Tip is a brand of cotton swab or Band-Aid is a brand of adhesive bandage.  Pork roll is a breakfast meat…similar to ham, but when pan-fried in a skillet or on a griddle, tastes much different.   It gets sliced (sometimes it comes sliced already) into a circle and then gets 3 or 4 slits around the circle…to prevent the finished product from curling around the edges.  

Once cut up, you put the pieces onto a hot, buttered griddle or frying pan and cook it for about 5 minutes on each side…or until it’s browned.  On the other side of the pan or griddle crack open your eggs….right on the hot pan!  Cook the eggs however you like them cooked….they are usually served fully fried or over medium (yolk harder), BUT some like it a over-easy and more runny.  You can cook it however you’d like.  

IMG_0006

Once it’s almost cooked to your liking you add the American cheese and let it cook until it’s melted on top of the eggs!

Next you simply layer it all on top of a hard roll, a bagel, a croissant..I prefer mine on a hard roll and add some salt, pepper and ketchup (SPK).   When you order one of these sandwiches in NJ…..they will always ask “saltpepperketchup?”   3 words, mumbled into 1, but that any New Jerseyian understands. 


I eat mine with just ketchup…no salt or pepper!  So that’d be “TEC K” in Jersey terms!  I’d say most people get “TEC SPK”. Make sense???  


There really isn’t a specific recipe for this breakfast sandwich…it’s really how you like it!  All you need is


Taylor Ham (pork roll) sliced

Eggs

American Cheese (sliced)

saltpepperketchup

Rolls, bagels….


And voila……THE MOST AMAZING THING EVER!

IMG_0009

~gianna~

Death By Chocolate

Here is a recipe that my Mom always made for special occasions when we were kids….I especially remember it on New Year’s Eve!  Her recipe was a little different because she used Heath Bars……and with all the nut allergies nowadays I stick with Kit Kats.  She also used to put Kahlua in her cake mix to give it a little extra kick, I do not.  You definitely can add the Kahlua and swap the Heath for the Kit Kats! But no matter how you do it…..you will be sure to have a crowd pleasing dessert!!!  It’s a very simple recipe, that really takes no time at all…..As long as you have the ingredients in your kitchen. You can make it for a large crowd, for a holiday, for a BBQ, or just for 2 people to share on Valentine’s Day (and the week following with leftovers).  I made this for New Year’s Eve and even though a lot of it went…I was so excited to have leftovers!!!!   It’s even better after it sits in the fridge for a few days!   YUM!!!!

Death By Chocolate 

1 box of Chocolate Cake Mix (I use Chocolate Fudge) 
1 box of Chocolate Mousse Mix 
1 large container of Cool Whip — remove from freezer and into fridge for 30 minutes-1hour before you make dessert. 
1 package of 6 — Kit Kat Bars 

 Follow directions on the cake mix box..and make your cake. 
Cool and then wrap the entire cake in foil and put in the freezer for a few hours. 
Make mousse by following the box..let cool in fridge for a few hours. 
In a food processor or by hand smash candy bars into pieces. 

When ready to make the dessert, get a large clear bowl. 
Crumble 1/2 of the cake into bottom of bowl. 
Next layer 1/2 of the mousse on top.
Next layer 1/2 of the Cool Whip. 
Sprinkle 1/2 of the candy pieces. 
Next layer the rest of cake crumbled.
Layer rest of mousse. 
Layer rest of Cool Whip. 
Finish off with candy pieces!

Image

~gianna~

Previous Older Entries

I'm just starting out; leave me a comment or a like :)

They Like It...

  • None
REAL MOMS EAT PIZZA

Keepin it Real since February 18, 2014

Welcome to the world of NECCO!

News, crafts, recipes and more from the New England Confectionery Company (NECCO).

Pies Pizza & Pasta

Simple tasty convienient food done on a budget please leave any comments on the recipie you have tried or any changes or ideas you have so I can try them and add a post with the changes.

Chocolate, Chicken & Coconuts

"Every time you eat or drink, you're either feeding disease or fighting it"

Cooking with Mr Fitz

A collection of food journeys & taste-full experiences

Gusface Grillah

All things BBQ, bacon, dude food & beer.

ice cream magazines

................... for lovers of ice cream. Your free on line magazine for sweet frozen treats. Recipes, inspiration, artisanal ideas for your delectation.

The Daily Post

The Art and Craft of Blogging