Bacon And Mushroom Mac-N-Cheese

Recently I found out a friend of mine makes a pretty “slammin” (this word was used) Mac-N-Cheese……and who doesn’t love the sound of an amazing Mac -N-Cheese?   When I asked him for the recipe, he sent me a link to a blog I frequent and one that has been mentioned here a few times!  Fake Ginger!!   BUT he had put his own twist on it…tweaking her recipe…..and then I did some tweaking of my own with what I had on hand!  Needless to say…….the mac and cheese was really…..AMAZING!  Joe and I enjoyed it, the girls (after picking out the mushrooms)…Ava loved it, but Olivia couldn’t get past the mushrooms.  3 out 4 of us…not too shabby!!!   I’m not going to give it a “Kid Approved” rating because Olivia specifically said, “NOT KID APPROVED!” which eating it, but it’s really pretty tasty and if your kids like mushrooms….they’ll probably like it!

Here is the original from Fake Ginger.   Alan (“slammin” Mac-N-Cheese maker) used more bacon, a different variety of cheeses and topped it with crushed Cheez Its…..and I used less variety of cheeses,  topped it with Cheez Its and used more bacon!   So as you can see, you can really spin this  recipe any way you want….and it’ll still be a delicious spin off of your regular, every day Mac-N-Cheese!   Give it a shot!!

Bacon and Mushroom Mac-N-Cheese

1 pound small pasta

1 teaspoon olive oil

3/4 pound bacon, chopped

8 ounces baby bella mushrooms, sliced thinly

1/4 cup butter

1/4 cup flour

2 cups chicken broth

1 cup light cream

salt & pepper to taste

4 cups extra sharp cheddar, shredded

1 cup Swiss, shredded

1 cup mozzarella, shredded

1/2-3/4C Cheez Its, crushed

spray olive oil

••••••••••••••••••••••••••••••••••••••••••••••••••••••••••••••••••••••••••••••••••••••••••••••••••••••••••••
Bring a lot pot of salted water to a boil.
Add pasta, stir, and let boil.
Heat olive oil in a large skillet over medium heat.
Add bacon and cook, stirring occasionally, until bacon is cooked and slightly crispy.
Remove bacon to a paper towel, using a slotted spoon…onto a lined plate to drain.
Pour off some of the bacon grease (or all & add a little more olive oil to the pan) and add mushrooms. Cook until mushrooms are browned and soft, about 10 minutes. Set aside.
In a medium saucepan make a roux by melting your butter and slowly adding your flour.  Whisking the whole time.
Slowly add in chicken broth and cream, continue whisking until sauce is thickened.
Season with salt and pepper. Remove from heat and stir in cheeses until melted.
Preheat oven to 375.
Once pasta is al dente, drain and put in large bowl.
Add bacon, mushrooms, and cheese sauce and stir to combine.
Pour into prepared 9 x 13 pan.
Top with crushed Cheez Its,  over the entire pan and spray lightly with olive oil.
Bake in preheated oven for 20 minutes or until pasta is bubbly.
Enjoy!
DSC01570
~gianna~

Fajitas

Fajitas are one of my favorite things in the world……I can’t even imagine anyone NOT liking them.  Cheese, peppers, sour cream, cheese, chicken, cheese, guacamole….CHEESE!!!!  And I  sometimes even use the full fat version of everything!!!!  Mmmmm….I love fajitas.

So while I have never met a chicken or shrimp fajita I didn’t like…I’ve also never met anyone who doesn’t like these fajitas….welllllll..except my sister-in-law, Ann…who slathered hers in ketchup when I made them for her and my brother in law!  I don’t think I ever made her fajitas again……and I probably never will!  🙂  Her loss!

These fajitas are so easy and so delicious, thanks to one special ingredient…the marinade!  It’s all in the marinade  and I’m not ashamed to admit it!  Someone perfected a perfect (in my opinion) fajita marinade and WOW it’s great!

marinade

When I make this I usually make extra so we have leftovers for lunch or another dinner.

So I don’t have many measurements and I sometimes substitute shrimp and it’s equally delicious!  I also love peppers and onions, so I go heavy on those!

Chicken Fajitas  (or shrimp)

Boneless, skinless chicken breasts (washed, trimmed and sliced into bite sized pieces)

OR

Uncooked shrimp (devined and shell removed)

World Harbors Fajita marinade (I usually use 1/4 – half a bottle)

Olive oil

Red bell peppers  (washed, cleaned and cut into slices)

Green peppers (washed, cleaned and cut into slices)

Vidalia onion (cut in half and then sliced)

Olive oil

Shredded Mexican Blend Cheese  (LOTS!)

Sour Cream

Guacamole or Avocado

Salsa

Clean and cut chicken.

In a large pan add chicken and Fajita marinade and toss and cook until it’s done.  Usually takes about 10 minutes.

Wash and slice peppers and onions into strips.

In another large frying pan add peppers, onions and olive oil.  Just enough for sauteing.   And cook those until done.  “Done” for the peppers and onions is however you like them.  I like mine cooked until still slightly crunchy. 

Heat tortilla shells (follow directions on bag)

fajita1

fajita2

Fill (or stuff…like I do) your tortillas with all the yummy toppings, roll it up and ENJOY!!!!

fajita3

~gianna~

7 Layer Taco Dip

This is a favorite of mine and it’s something that I have been making for years and years….I think the first time I brought it to a party I was actually in High School……sooooo it’s OLD!   But it’s something that never disappoints..well except this one time when I brought it to a party and some drunk friends decided to put it in the oven and cook it……..people still ate it, but it wasn’t very tasty.   PLEASE…DO NOT HEAT THIS DIP….TRUST ME!  The nice thing about this dip is that you can make it however you want…..and add or subtract ingredients….or add extra or less of others…..Just make it to your liking.  There really aren’t measurements to it!  This is perfect for any time of year……and a great dip for football games!

7 Layer Taco Dip


Can of refried beans

Container of Guacamole (or make your own, which I often do)

Container of Sour Cream

Package of taco seasoning

Tomatoes — seeds removed and chopped

Olives — sliced

Shredded Mexican blend cheese

Scallions

Tortilla chips (I like the bite sized ones….they are perfectly sized for dipping and enjoying!)


1.  Spread refried beans over a large circle serving platter.  I try to use one with a small lip.

2.  Spread guacamole on top of beans.

3.  Mix sour cream and taco seasoning in bowl and then spread over guacamole.

4.  Layer chopped tomatoes on top of the sour cream mixture.

5.  Spread sliced olives all around.

6.  Sprinkle cheese on top of the tomatoes and olives.

7.  Sprinkle chopped scallions over the entire dip.

8.  DO NOT COOK  🙂

9.  Serve with chips

10.  ENJOY!!!!

taco dip

~gianna~

Homemade Pizza

Joe and I decided to start (or I should say re-start from my childhood) a family tradition!  Making pizza!     Every Friday, when I was growing up was pizza night!  We would sometimes order pizza if we were busy or if my brother’s or I had something going on…or my Mom would make her own!  I can still remember the smell that took over my house on those nights!  It may be the BEST smell in the world!     Sauce, bubbling on the stove, dough being rolled out, cheese being shredded….and then once it was in the oven……Mmmmmmmmmmm

Now that I have my own family and the girls are getting old enough to help out I am excited to start this tradition and have it continue as long as we can!  Friday nights we normally don’t have anything going on aside from swim.  So I usually pull the dough early in the afternoon so it’s room temperature when I’m ready to roll.  I also start the sauce early and let it simmer for a while.   This is when those familiar smells begin to take over my kitchen!   My girls love spreading the sauce and sprinkling (and eating) the cheese and then it starts “Mmmmm…..it smells so good!”  “How much longer?”   “Is it almost ready?”

Approx 20 minutes later…..DING!  It’s done!  Fresh, hot, homemade pizza for my family….and it makes me happy because it’s one meal I know everyone will eat!   Perfect for football Sunday,Super Bowl, or any time you want some pizza!

One important factor that really makes a huge difference in the taste of the pizza is the dough.  I’ve gotten different kinds…frozen, from the bakery, refrigerated….and once I found the perfect dough (local:  Stop N Shop in the bakery..it’s their own dough) I won’t use anything else.  It’s easy to roll and shape and the taste is like none other!  So make sure you try different brands to find a good fit!

Homemade Pizza

Olive Oil

Garlic (minced)

Basil

Sugar

Large can of crushed tomatoes

Pizza dough (2 pounds = enough 2 pizzas)

Parmesan cheese

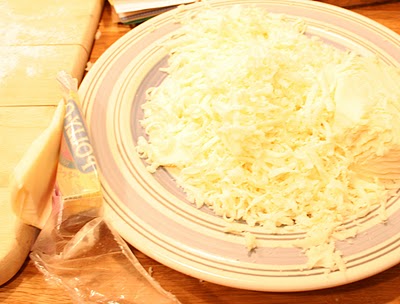
32oz of mozzarella cheese (shredded) OR I get the chunks and shred it myself!

Bring pizza dough to room temperature.  While waiting…….

Heat 1TBSP of olive oil in a pan.  Add garlic and basil for about 1 minute.  Add can of crushed tomatoes.  You can add any kind of seasonings to it that you’d like…oregano, hot pepper seeds, etc.  (My girls don’t like “brown stuff” in their gravy so I don’t add anything extra!)  Bring to boil and then lower to simmer.  Simmer on low for approx 25-30mins.

Preheat oven to 375° degrees.   While waiting for your gravy….

Using a small amount of olive oil grease your cookie sheets.

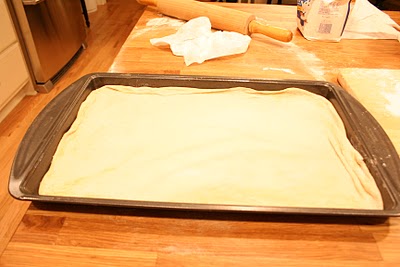
Once dough gets to room temp, begin rolling and stretching on well floured counter top until it gets to the size of your cookie sheets and the thickness you like your pizza..  I normally do rectangle cookie sheets, and like my pizza on the thinner side..but not extra thin.    You can use a round pizza pan, you can make your pizza crust thicker..it’s really whatever you like!

Once it’s to the thickness and size you’d like, carefully lift dough and place it on your cookie sheets/pizza pans.

Pinch gently around the perimeter to form a slight crust.

pizza1

Using a cheese grater, shred your cheese (if you are going this route).

pizza2

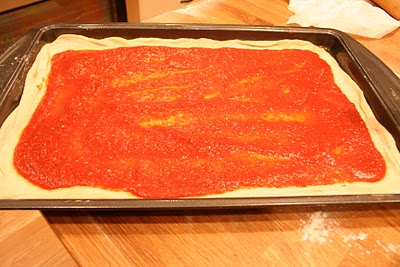
Your gravy should be done, or almost done.   Once it’s finished, ladle it on top of your crust and spread it evenly on top.  Make sure you leave some room around the edge for your “handle”.  

pizza3

Next sprinkle with Parmesan cheese and then nice handfuls of mozzarella cheese!  Spreading them evenly and using as much as you’d like! 

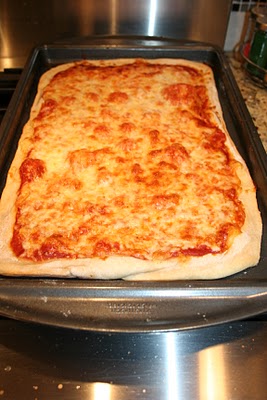
 Cook pizza in hot oven for approx 20-25 minutes, but keep checking it and cook to however you like it (crispy, well done, doughy, etc).   Normally 20 minutes is good for us, but we have a brand new oven and it really cooks everything evenly.  I know my Mom’s oven doesn’t so she has to cook it for longer and she sometimes rotates them during cooking time!

When you remove it from the oven, let it sit and settle for approx. 5 minutes.

ENJOY!!!

pizza4

~gianna~

I'm just starting out; leave me a comment or a like :)

They Like It...

  • None
REAL MOMS EAT PIZZA

Keepin it Real since February 18, 2014

Welcome to the world of NECCO!

News, crafts, recipes and more from the New England Confectionery Company (NECCO).

Pies Pizza & Pasta

Simple tasty convienient food done on a budget please leave any comments on the recipie you have tried or any changes or ideas you have so I can try them and add a post with the changes.

Chocolate, Chicken & Coconuts

"Every time you eat or drink, you're either feeding disease or fighting it"

Cooking with Mr Fitz

A collection of food journeys & taste-full experiences

Gusface Grillah

All things BBQ, bacon, dude food & beer.

ice cream magazine

................... for lovers of ice cream. Your free on line magazine for sweet frozen treats. Recipes, inspiration, artisanal ideas for your delectation.

The Daily Post

The Art and Craft of Blogging