Roasted Cauliflower

I know my kids and my husband pretty well and cauliflower isn’t on the “LIKE” list for any of them!    I knew my cousin, Amanda,  was coming for dinner before our weekly dodgeball game and she was eating here….so I shot her a text asking if she liked cauliflower, she said yes….and it worked out beautifully!

The recipe I received was from Lisa and it’s Roasted Cauliflower  (from Simply Recipes) and it was delicious!  I followed the recipe exactly (only omitted the salt and pepper — I never use it) because I hardly make cauliflower and I didn’t want to mess it up!
Ava was eating raw cauliflower dipped in ranch dressing as I was cutting the cauliflower up!  So much for thinking my kids don’t eat it!  ((SHRUG))

Everyone tried it and BOTH of my girls ate it.  Joe tried 1 piece and thought it was OK……but that’s to be expected since he doesn’t love veggies!  My cousin Amanda thought it was delicious, and we had a surprise dinner guest (my best friend who came over to get ready for dodgeball) and she thought it was delicious too!   It’s a keeper in this house!!!  Thanks Lisa!!!  Because it was a dodgeball night I had to make something quick and easy so  I made chicken cutlets and biscuits with it!

cauliflower

Roasted Cauliflower 

Ingredients

1 head of cauliflower

2-3 cloves of garlic, peeled and coarsely minced

Lemon juice from half a lemon

Olive oil

Coarse salt and freshly ground black pepper

Parmesan cheese

*****************************************************

Preheat oven to 400°F.

Cut cauliflower into florets and put in a single layer in an oven-proof baking dish.

Toss in the garlic.

Sprinkle lemon juice over cauliflower and drizzle each piece with olive oil.

Sprinkle with salt and pepper.

If the oven hasn’t reached 400°F yet, set aside until it has. 

Place casserole in the hot oven, uncovered, for 25-30 minutes, or until the top is lightly brown.

Test with a fork for desired doneness.

Fork should be able to easily pierce the cauliflower.

Remove from oven and sprinkle generously with Parmesan cheese. Serve immediately.
ENJOY!

~gianna~

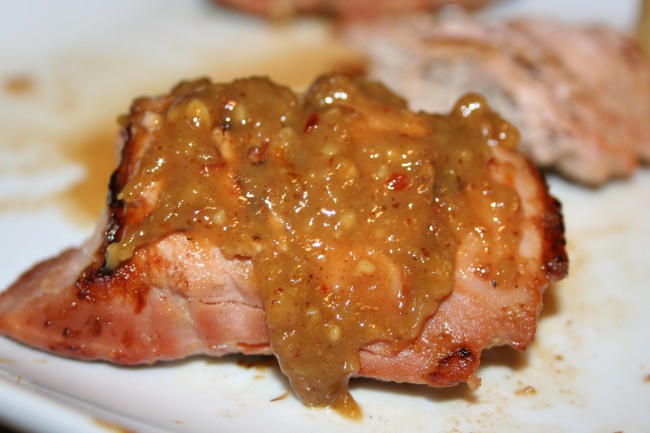
Sweet and Sassy Pork Tenderloin

As you know…..I’m not a huge meat eater, with the exception of chicken, turkey and seafood….the only other meat I like is pork!   Well NOT all pork, but some!   This pork tenderloin recipe is to die for! When I say it’s delicious, it’s an understatement. It’s so tender and has the perfect amount of sweet and spice (sassy)!  I got the recipe from my friend, Jen!  Thanks, Jen!!!  🙂    I know here in Jersey it’s hard to use a grill right now since most grills are under 2 feet of snow, but if you have access to your grill….or you can ice pick your way to it……DO IT!

The key is marinating it for long enough and cooking it perfectly. I can promise you, you will add this to the rotation. As for my kids….they LOVE it! 

 I always double or triple the marinade recipe so there is enough sauce to smother and dip!  You should definitely do the same!  This is also a perfect dinner idea if you are having company….well..because it’s that good and you will get rave reviews!  PROMISE!!!

SWEET AND SASSY PORK TENDERLOIN 

2 pounds pork tenderloin 

4 tablespoons brown sugar 

2 tablespoon Worcestershire sauce 

4 tablespoons apple cider vinegar 

2 tablespoon Spicy Brown Mustard 

2 cloves garlic, minced 

1 teaspoon crushed red pepper flakes…if you want it more sassy, add more! 

2 teaspoon prepared horseradish 

Cut tenderloin into 1-1.5 inch thick pieces..and place in large bowl. I got about 8 pieces out of mine. 

Stir together sugar, Worcestershire sauce, vinegar, mustard, garlic, red pepper flakes, and horseradish in bowl, until blended and pour over pork. 

Let marinate for at least 2 hours..I do it all day! 

Place the meat onto preheated grill (med/high heat). 

Grill until no longer pink in the center, approx 8 minutes per side. 

When finished, place pork on a plate, and allow to rest for 5 minutes. 

While meat is cooking bring the marinade to a boil on the stove, and simmer over medium heat, and stir until smooth. Pour sauce over sliced tenderloin to serve.

 Enjoy!!

Image

~gianna~

Shrimp Fettuccini Alfredo

My beautiful, talented, amazing cousin, Rachele just had a brand new baby…… yesterday  (YAY!!!!)    So it’s only fitting I post about it now, since it came from her!  🙂  CONGRATS, MAMA!!!

I had been looking for a new shrimp recipe recently and my cousin  sent me this recipe for Shrimp Fettucini Alfredo.    I don’t think she had even tried it yet……when she first sent it to me, but I’m glad she did!!  My husband and I really enjoyed it, Ava only liked the shrimp part and Olivia didn’t like it at all.   So I guess you’ll have to make it for yourself and decide how you feel.   It was very simple, very filling, and very good too!

Shrimp Fettuccini Alfredo

1 box (12 oz) fettuccini (I used plain, but you can use spinach too)

1 TBSP olive oil

1 small red onion (halved and sliced)

2 cloves of garlic

1 pound shrimp (cleaned, thawed and deveined)

2/3 cup Garden Vegetable Cream Cheese

1/3 cup heavy cream

2 TBSP dill (chopped)

2 TBSP capers

2 TBSP lemon juice

Salt & Pepper to taste

******************************************

Cook pasta as package suggests — cook, drain and reserve 1/2 cup pasta water.

Heat oil in medium skillet over medium heat.

Add onion and garlic and cook for 5 minutes.

Stir in shrimp, cream cheese, dill, capers, lemon juice, salt and pepper.

Cooked 3-5 minutes or until shrimp are cooked.

Add pasta and reserved water to skillet.

Enjoy!

Image 26

~gianna~

Red Velvet Fudge Pie

As I’ve discussed previously, red velvet is my favorite dessert.  I love anything red velvet….so when I got this list of 30 red velvet recipes, I was ready to try them all!     I had already tried the Red Velvet Oreo Brownies and got rave reviews from everyone that tried them…but this one I just knew would be another crowd pleaser.     The perfect occasion to try it was on Valentine’s Day because well….it was Valentine’s Day, the day of everything chocolate and LOVE ❤  but also because my family would be celebrating my Dad’s birthday on Valentine’s Day this year.  He was going away for his actual birthday (yesterday).   He actually requested  “NO RED VELVET THIS YEAR!” and “SOMETHING MORE PLAIN!”…..so I did make him a regular boxed cake with cream cheese frosting.  I know…GASP…boxed cake.  but given we’d been snowed in for days and cooking and baking for most of them….I needed the comfort and ease of a plain white cake with cream cheese frosting.  Plus I also knew I’d be making the pie as a second dessert and it’d take some time!    HOLY COW!!!!  This pie was unreal!!!  Like don’t wait until next Valentine’s Day to make it……you need to make it now!  Like AS.  SOON.  AS.  POSSIBLE!  It’s that good!  Everyone loved it, including my Dad….who requested NO RED VELVET.  He actually went for a piece of the pie first!      It was simple and delicious.  I can’t wait to make another one…SOON!

The recipe came from HERE .  I follow her Facebook page and she always has some really amazing desserts and creative, fun things!  Check her out!!!

Red Velvet Fudge Pie

**The amount of cake batter makes 2 pies, but I only used half the batter and made 1 pie.  Saved the rest for a plain cake. BUT I used all the fudge topping!

Ingredients
1 box red velvet cake mix (3 eggs, 1/3 cup vegetable oil) 

1/2 cup butter

12 ounces mini  chocolate chips

1 14-ounce can sweetened condensed milk

2 refrigerated pie crusts (or homemade, your choice)

********************************************************************

Preheat oven to 350°

Unroll pie crust into pie pan.

Prepare cake mix according to instructions on back.

 Mix well and pour into refrigerated pie crust in pan.

Bake for 30-35 minutes or until crusts are golden brown and toothpick inserted in center comes out clean.

If crusts begin to brown before pie is done, cover loosely with aluminum foil.

In medium saucepan, combine butter, 10 ounces of chocolate chips (reserve some for garnish) and sweetened condensed milk.

Stir (medium heat) until smooth and pour over pies.

Garnish with extra chocolate chips!

Let cool completely.

ENJOY!!

Image 3

AMAZING!!!

Image

I didn’t let it cool long enough, which is why the chips melted, but it didn’t matter….it was still unreal!

~gianna~

Happy Valentine’s Day

I’m sure it comes as no surprise that we’ve been snowed in 2 days in a row….and we are going a little crazy.  I had wanted to make red velvet pancakes, but I didn’t have the stuff, so I had to just make regular pancakes.  My little Valentine’s loved them…..and it was a great start to another snow day!

I didn’t have any pancake mix so I made my own, dyed it red and made them heart shaped.  Voila!  Valentine’s Day breakfast!

Very simple, using ingredients most people have on hand and yummy (I don’t really eat pancakes, but my girls enjoyed them).

Valentine’s Day Pancakes

1 cup flour

2 TBSP sugar

2 tsp. baking powder

1/2 tsp salt

1 cup milk

1 egg

1 TBSP oil (I used canola)

2 TBSP butter (melted)

Red food coloring (I just added to get a red color)

*************************************************

Whisk ingredients in a large bowl.  

Grease and heat pan

Pour mix into a heart shaped cookie cutter.

Once pancake starts to bubble a decent amount, remove cookie cutter and flip pancake.  

Cook for another minute or two until the other side is a cooked thru….and gets a little brown.

Serve with your choice of toppings.  

Syrup, powdered sugar, whipped cream, fresh fruit….

ENJOY!

Image

Happy Valentine’s Day, Everyone!

XOXOXOXOXOXO

~gianna~

Fried Potatoes

Fried Potatoes are one of those foods that take me back to my childhood.  Both my Mom and my Nana used to make them……for breakfast, lunch and dinner.  If it was for breakfast, they were served with eggs and bacon, for lunch maybe peppers and onions (eggs sometimes too) and for dinner as a side dish.    These potatoes are like a comfort food to me……french fries, bread and butter and grilled cheese are my top 3 comfort foods…but this is up on the list!

Do you have any comfort foods?

Or foods that bring you back to your childhood?

What are they?

Fried Potatoes

Russet Potatoes

Olive oil

Salt and pepper (or any other seasoning you may like on potatoes..old bay, garlic, ketchup)

***************************

Fill a large pan with oil.  You want to make sure you have enough oil, but not too much.  I fill mine up about half.

Wash and peel potatoes

Slice potatoes THIN.

Heat oil up in pan.

Place potatoes into hot oil in a thin layer. And sprinkle with salt all over.

IMG_1809

Cook for about 5-10 minutes and then flip them and cook another 5-10 minutes….you want to make sure they are soft and brown.

Crispy are OK too…..they’ll be more like potato chips.

Season how you’d like.  More salt, pepper or Old Bay are what we usually use….but any  other seasoning works well too!!

IMG_1811

Enjoy!

~gianna~

Shrimp over Angel Hair

I cook shrimp a lot in my house because everyone loves it!  This recipe has been in my rotation for a long time.  When I say rotation I mean I make it every few months or more because I have so many other recipes that I make, but this one I know is a sure winner every time!  It’s another simple recipe and if you have shrimp on hand (I always have a bag or 2 of frozen uncooked shrimp in my freezer) it’s a great weeknight meal.  Add some garlic bread and a salad and you’re done!  Easy Peasy!

Shrimp Over Angel Hair

1/2-1 pound of angel hair pasta (cooked)

2 TBSP olive oil

3-4 cloves of garlic (minced)

2 ripe tomatoes (I use the small ones on the vine) — seeds removed and chopped

1/2 c water

chicken bullion cube

1 pound uncooked shrimp (cleaned and deveined)

basil

******************

Cook Pasta

In a pan on stove add oil and garlic and brown.

Add chopped tomatoes.

Add water, basil  and bullion cube and simmer for about 10 minutes.

Add shrimp and cook until they turn pink.

Serve over pasta.

**We put Old Bay on the finished dish  just to add a little more spice/flavor, but you don’t have to!

ENJOY!

IMG_0150

~gianna~

Red Velvet Oreo Brownies

Last week someone posted a link to 30 Red Velvet recipes on Facebook.   With my love of all things red velvet I knew I’d love to stuff my face with all of it…..and eventually I will.    Another snow day = more baking.  The girls and I headed out in the state of emergency (due to an ice storm) to get the stuff we needed.  Probably not the smartest thing, but I only had to drive a minute to the nearest food store.    I couldn’t decide which recipe I wanted to make, but finally settled on these brownies to start.  I also got stuff to make a few other recipes too…just in case we had another snow day the following day (thankfully, we didn’t) because it’s been the norm in Jersey this winter.

The girls and I got right to work……because there are a few different layers in this recipe and it seemed a bit time consuming.   This recipe has a red velvet brownie layer, an Oreo frosting layer, a chocolate gnache layer all topped with more crumbled Oreos!   DELICIOUS!  Not exactly a recipe you’d eat when you’re watching your calories…but everything in moderation, right?

Red Velvet Oreo Brownies
 
RED VELVET BROWNIES
2 large eggs
1/2 cup unsalted butter
1 cup sugar
2 teaspoons vanilla extract
1/4 cup cocoa powder
1/8 teaspoon salt
1 Tablespoon liquid or gel red food coloring
3/4 teaspoon white vinegar
3/4 cup  flour
 
COOKIES ‘N CREAM FROSTING
1/4 cup butter, softened to room temperature
1 and 3/4 cups confectioners’ sugar
2-3 Tablespoons heavy cream 
6 Oreos, crushed
 
CHOCOLATE GANACHE
4 ounces semi-sweet chocolate 
1/2 cup heavy cream 
2 Tablespoons  unsalted butter, softened to room temperature


******************************************

Preheat the oven to 350°

 
Line an 8×8 baking pan with aluminum foil, leaving enough overhang on the sides to lift the brownies out of the pan. Set aside.

Make the brownies: In a small bowl, beat the 2 eggs together. Set aside.

Melt the butter.

Stir in 1 cup sugar, 2 teaspoons vanilla extract, cocoa powder, salt, food coloring, and vinegar. Mix each of those ingredients into the batter in that order.
 
Whisk in the eggs, then fold in the flour until completely incorporated. Do not overmix.
 
Pour the brownie batter into prepared baking pan. 
 
Bake the brownies for 22-24 minutes or until a toothpick inserted in the middle comes out mostly clean, with a few small moist crumbs. Allow the brownies to cool at room temperature for 30 minutes, then transfer to the refrigerator to cool completely.
 
Make the frosting: With a handheld or stand mixer  beat the butter until light and creamy – about 1 minute.
 
Add the confectioners’ sugar and 2 Tbsp cream, beating on medium until creamy.
 
Add 1 more Tbsp cream until the frosting is spreadable consistency. You want it to be thick so that the frosting layer stays neat when you cut into the brownies.
 
Fold in the crushed Oreos.
 
Lift the cooled brownies out of the pan and spread them with the frosting.
Stick them into the refrigerator as your prepare the ganache. You want the frosting to slightly chill on the brownies.
 
Make the ganache: Break up the chocolate into small pieces in a medium bowl.
 
Heat the heavy cream until boiling, either in the microwave or on the stovetop.
 
Pour boiling cream over the chocolate and stir until the chocolate is melted and smooth.
 
Cut in the butter, one small piece at a time, and stir until smooth.
 
Chill the gnache for a little bit in the fridge until it’s thick enough to spread.
 
Spread over frosted brownies. 
 
Chill for at least 30 minutes before cutting.
 
Cut the brownies into squares, wiping your large knife off with a wet paper towel between cuts so that the layers stay neat.
 
DSC01484
 
 
Thanks, Sally!  These were amazing!!!
~gianna~

Meatloaf…..Smeatloaf….Double Beatloaf……

I was never a huge fan of meatloaf….in fact growing up my Mom made it all the time and I never really ate it.  And if I did it was smothered in ketchup and the rest would be hidden in a napkin and thrown out after dinner.  I did like the potatoes that she made with it.   As I’ve grown up I still didn’t love it, but I have finally created a recipe that has added meatloaf to things I make!  It’s simple, a one pan meal, and it uses ground turkey instead of beef.  As you will see in a lot of my recipes I don’t cook a lot of  red meat (I just don’t like the taste)…so I try to swap it out lot of times with chicken or turkey!  It’s not that I’m against red meat or worry about the health aspect of it (obvii…just look at my other recipes) I just like the taste a bit better….this recipe pretty much tastes the same as ground beef, but it feels and tastes a little “lighter” to me.

Turkey Meatloaf 

Ingredients:

1 lb. ground turkey

1 egg

Approx 1 1/2 c. Italian bread crumb

Onion powder

Garlic powder

Salt and pepper

A nice large, handful of shredded mozzarella cheese.   (Did I say LARGE….Do it!)

1/2 of a Vidalia onion  (You can use any kind of onion)

Potatoes (any kind you like, I used red this time)


Directions:

Preheat oven to 350°.

Mix all ingredients in a Kitchen Aid Mixer on medium until everything is incorporated.

Using olive oil, grease the bottom and sides of a 13×9 baking dish.

Form meat mixture into a loaf and put it in the center of baking dish.

Cut potatoes into large, bite-sized pieces and sprinkle them in the pan around the loaf.

Cut up some onions and sprinkle those around the loaf with the potatoes.

Sprinkle the potatoes and onions with a little garlic salt.

Cover w/ foil and cook for 45 minutes.  (Oven times may vary)

***Halfway through cooking….remove foil and give the potatoes and onions a good stir around the pan so they get browned and don’t burn.

***Remove foil with 10 minutes left…so it gets brown on the top!   You may want to slice a few pieces and make sure it’s not pink inside…sometimes depending on how thick the loaf is…it may need a little more time to cook.

 ***Don’t be alarmed if it starts to ooze white stuff…it’s the cheese! I freaked out a little the first time.****

ENJOY!!

meatloaf

When it’s done slice and serve …….I still like mine with ketchup!!!!!

~gianna~


Creamy Taco Mac

Here’s another recipe that has circulated around the internet and has gotten rave reviews….once I finally got around to making it I was happy I did.  It’s simple, easy and my family really likes it!    Even the girls  (usually my tough crowd) LOVE it!  It’s even better as a leftover!  Normally we aren’t big leftover people…..but I have made extra of this so we have leftovers for another night!   It’s that good!

Creamy Taco Mac

1 lbs ground turkey breast
1/2 vidalia onion, chopped
8 oz dry pasta + 1 cup reserved pasta water
1 can (14.5 oz) petite diced tomatoes
4 Tbsp mild taco seasoning
4 oz cream cheese
1/2 cup sour cream
1/2 cup Mexican blend cheese
salt & pepper

Bring a large pot of salted water to boil and cook pasta per directions. Reserve one cup of pasta water.

Over medium heat, brown ground turkey until no longer pink.

Add onion and cook for 5 minutes.

Add taco seasoning and diced tomatoes.

Allow to simmer over low heat for 5 minutes.

Add cooked pasta, reserved water, cream cheese, and sour cream.

Give it a good stir until cheeses are melted and totally incorporated.

Simmer over low heat for 2-3 minutes.

Season with salt & pepper, as desired.

Top off with Mexican cheese.

ENJOY!!

IMG_0135

~gianna~

Previous Older Entries

I'm just starting out; leave me a comment or a like :)

They Like It...

  • None
REAL MOMS EAT PIZZA

Keepin it Real since February 18, 2014

Welcome to the world of NECCO!

News, crafts, recipes and more from the New England Confectionery Company (NECCO).

Pies Pizza & Pasta

Simple tasty convienient food done on a budget please leave any comments on the recipie you have tried or any changes or ideas you have so I can try them and add a post with the changes.

Chocolate, Chicken & Coconuts

"Every time you eat or drink, you're either feeding disease or fighting it"

Cooking with Mr Fitz

A collection of food journeys & taste-full experiences

Gusface Grillah

All things BBQ, bacon, dude food & beer.

ice cream magazines

................... for lovers of ice cream. Your free on line magazine for sweet frozen treats. Recipes, inspiration, artisanal ideas for your delectation.

The Daily Post

The Art and Craft of Blogging