Welcome and Happy New Year!!

5 YEARS!!!!  I haven’t posted in 5 YEARS!  Wow, a lot has changed in my life in those years……but the most important things I’ve learned are to always stay true to yourself and food is essential to life, therefore make it good!

In 5 years I haven’t stopped cooking, but I don’t do it nearly as much as I’d like.    Life happens and my girls are growing up, which makes life busy, but we still find time to cook and bake!  So here I am, back to my blog to share 5 years of recipes that I cannot wait to share with you!    Not only will I share my own recipes and my family’s recipes, but other recipes I find along the way – the ones that are worthy of blogging about.   Whether I get them from other blogs, Pinterest or friends or relatives, if they are great and I make them (with or without tweaking) you will eventually find them here!

My goal is to post a new recipe once a week (or more), but considering I haven’t been here in 5 years and I now have a full-time job teaching on top of being Mom to a teen and a tween who keep me busy, I promise to do my best!  🙂

I am super excited to be back and can’t wait to cook with you!

Stay Tuned!

~gianna~


Panara Chocolate Chip Cookies

As I’ve mentioned before I am a chocolate chip cookie failure!  I just can’t make a perfect chocolate chip cookie….and here is another recipe to prove that!  HA!  These were BIG, and delicious……and we all enjoyed them!  BUT there were slightly brown and not as soft as I thought they’d be….surprised?  I’m not!  That’s how I roll in chocolate chip cookie baking.  It’s embarrassing, it really is….. but I’m trying!

I found this recipe on Pinterest and here is the Chocolate Chip Cookie Recipe.   And as I said before they were great…very tasty and we all enjoyed them and I followed the recipe EXACTLY!  Maybe you’ll have better luck and your cookies will look and feel just as the originals do!  Let me know how that goes!

Panara Chocolate Chip Cookies

1 c butter, softened
1/2 c shortening
1 1/2 cup dark brown sugar
1/2 cup granulated sugar
2 large eggs
4 teaspoon vanilla extract
4 1/3 cup all-purpose flour
2 tablespoon cornstarch
2 teaspoon baking soda
1 teaspoon salt
1 bag mini semi-sweet chocolate chips

••••••••••••••••••••••••••••••••••••••••••••••••••••••••••••••••••••••••••••••••••••••••••••••••••

Mix butter, shortening and sugars until light and fluffy.
Add egg and vanilla and mix until well combined.
Combine flour, cornstarch, baking soda, and salt and mix together.
Mix dry ingredients slowly into wet ingredients and blend well.
If the dough is crumbly, stir in water 1 teaspoon at a time until it just holds together. The dough should not be sticky.
Add in chocolate chips and stir until evenly distributed.
Using ¼ cup measure, scoop out dough and form into a ball. Continue until all dough is balled. Approx 24 cookies.
Place dough in the freezer for 2 hours or up to 3 months.
Place frozen cookie onto parchment lined baking sheet and bake at 350 degrees F for 15 min.
Let cool 2 minutes.

ENJOY!

***notice the brown, crispy look??***

DSC01068

They were HUGE!!!

DSC01067

~gianna~

Grilled Pork Tenderloin

Now that the weather is finally getting warmer…..and then colder ……and then warmer again (New Jersey life!) I’m excited to slowly start bringing out my Spring/Summer recipes.   I LOVE all things warm (hot actually) weather and food is definitely on the top of my list!  Fruits and veggies are more delicious, everything is a bit lighter and of course……I can add the grill to my cooking rituals.

I honestly have no idea where I got this recipe….but I got it awhile ago.  If it’s yours, let me know and I will give props!   It’s for a delicious grilled pork tenderloin.  Simple and delicious!


Grilled Pork Tenderloin

1 boneless pork tenderloin (any size…..I used a 2 pound)
1/4 cup soy sauce (I use low sodium)
1/4 cup honey
5 garlic cloves, chopped
3 T. fresh ginger, minced

Combine all ingredients in a plastic bag and marinate for at least 4 hours.   I did mine overnight which made it so tender.

Set grill to medium heat. When ready, place pork on grill and cook for approximately 20-25 minutes, flipping once halfway.  Mine was about 12 minutes on each side!

ENJOY!

porktenderloin


~gianna~

Flank Steak Marinade

Sorry I’ve been a bit MIA….life sometimes gets in the way of blogging and life has been crazy over here!  But I had some time the last few days to schedule some more yummy recipes!

I don’t eat (or cook) much red meat, as you may have noticed with my lack of red meat cooking.  It’s really for no other reason than I don’t like the meaty taste in steaks, burgers, ground beef.   BUT if I find a good recipe that is very flavorful and can camouflage that taste I don’t like……it’s a keeper!  And this is one of those recipes!    I got it from a friend of mine a few years ago.  This marinade is sweet and savory…..it also really keeps the meat tender.   YUM!

When grilling flank steak…it’s best cooked on a high heat for a short amount of time.  And it’s best when it’s medium rare…if you overcook flank steak it gets tough.  Also it should be sliced on the thinner side, against the grain and on a slight angle.   I learned all of this from my Uncle when I made this recipe for Easter!  🙂

Flank Steak Marinade

(this is for about a pound of meat)

 1/4 c. oil

3+ Tbs. red wine vinegar (may need more)

1/2 c. soy sauce

1 Tbs. garlic powder

1 Tbs. minced onion

3+ Tbs. peach preserves (can use apricot if can’t find peach) – may need more to taste.

 Combine all ingredients in large zip lock bag with meat and stick it in the fridge no less than 3 hours, but as long as over night!  The longer it sits, the better it tastes.  I usually keep mine in over night, and during the time it’s in the fridge I squish it around in the bag to make sure all the meat gets nice and marinated!

 Heat grill to medium-high.  Place steak on grill and cook for about 5 minutes in each side….I wouldn’t go less than 4 or more than 7 on each side.

 Remove from grill and place on cutting board.  Let it sit for a few minute, slice and serve!

 ENJOY!!!

IMG_0626

~gianna~

Warm Bacon and Cheese Dip

Here is a yummy dip recipe that I’ve made for parties!   Very simple and very delicious!  Who doesn’t love a combo of cheese, onions and BACON?  Mmmmmmmmmmmmm……….. All cooked together into melty goodness?    It’s sure to be a crowd pleaser!
Warm Bacon and Cheese Dip
1 block of cream cheese, softened
1 bag of shredded cheese, mild or sharp
1 16 oz. jar of sour cream
2 or 3 oz bacon pieces
-I buy the Hormel brand and the jar is exactly what you need, 2 or 3 oz, that is the way it comes — pieces not bits
1 cup of chopped green onions
**********************************************************************
Combine all ingredients
Put in oven safe dish
Cover in foil
Bake on 350* for 35-45 min
Serve with tortilla chips!
ENJOY!
DSC01427
~gianna~

Kale and Bacon

So I tried to jump on the kale bandwagon, but failed miserably.  I liked it, but I didn’t love it.  I tried it in place of lettuce in a salad…..annnnnnd I’d rather just eat lettuce in my salad.  Anyone else agree?  Or am I alone?

Sooooo…I asked my cousin (yeah, we talk about food a lot) how else she makes kale and she said to just saute’ it with bacon!  Sounded easy enough!  I waited until Joe was away on business (because I knew he wouldn’t eat it) and my girls were already fed and in bed and started on this recipe…that I was kinda dreading, but wanted to try!   I was pleasantly surprised.   I don’t think I’ll make it again any time soon, but it wasn’t horrible……it was very flavorful and very simple!   Maybe for a side dish…..or if I’m feeling healthy (but not too healthy….since I love bacon!)

I didn’t have an actual recipe. Here’s what I did:

Kale and Bacon

olive oil

2 cloves of garlic

4 slices of bacon — chopped

1 bag of kale (I used almost the whole thing…it shrinks down A LOT!

fresh lemon juice

••••••••••••••••••••••••••••••••••••••••••••••••••••••••••••••••••••••••••••••

In a pan saute’ oil and garlic.

Add chopped bacon and cook for about 5-10 minutes, until bacon is cooked and a bit crispy.

Add kale and cook for another 5 minutes or so, until it’s cooked thru and tender.

Add salt and pepper to taste.

Squeeze fresh lemon on top.

Enjoy!

Image 14

~gianna~

Bacon And Mushroom Mac-N-Cheese

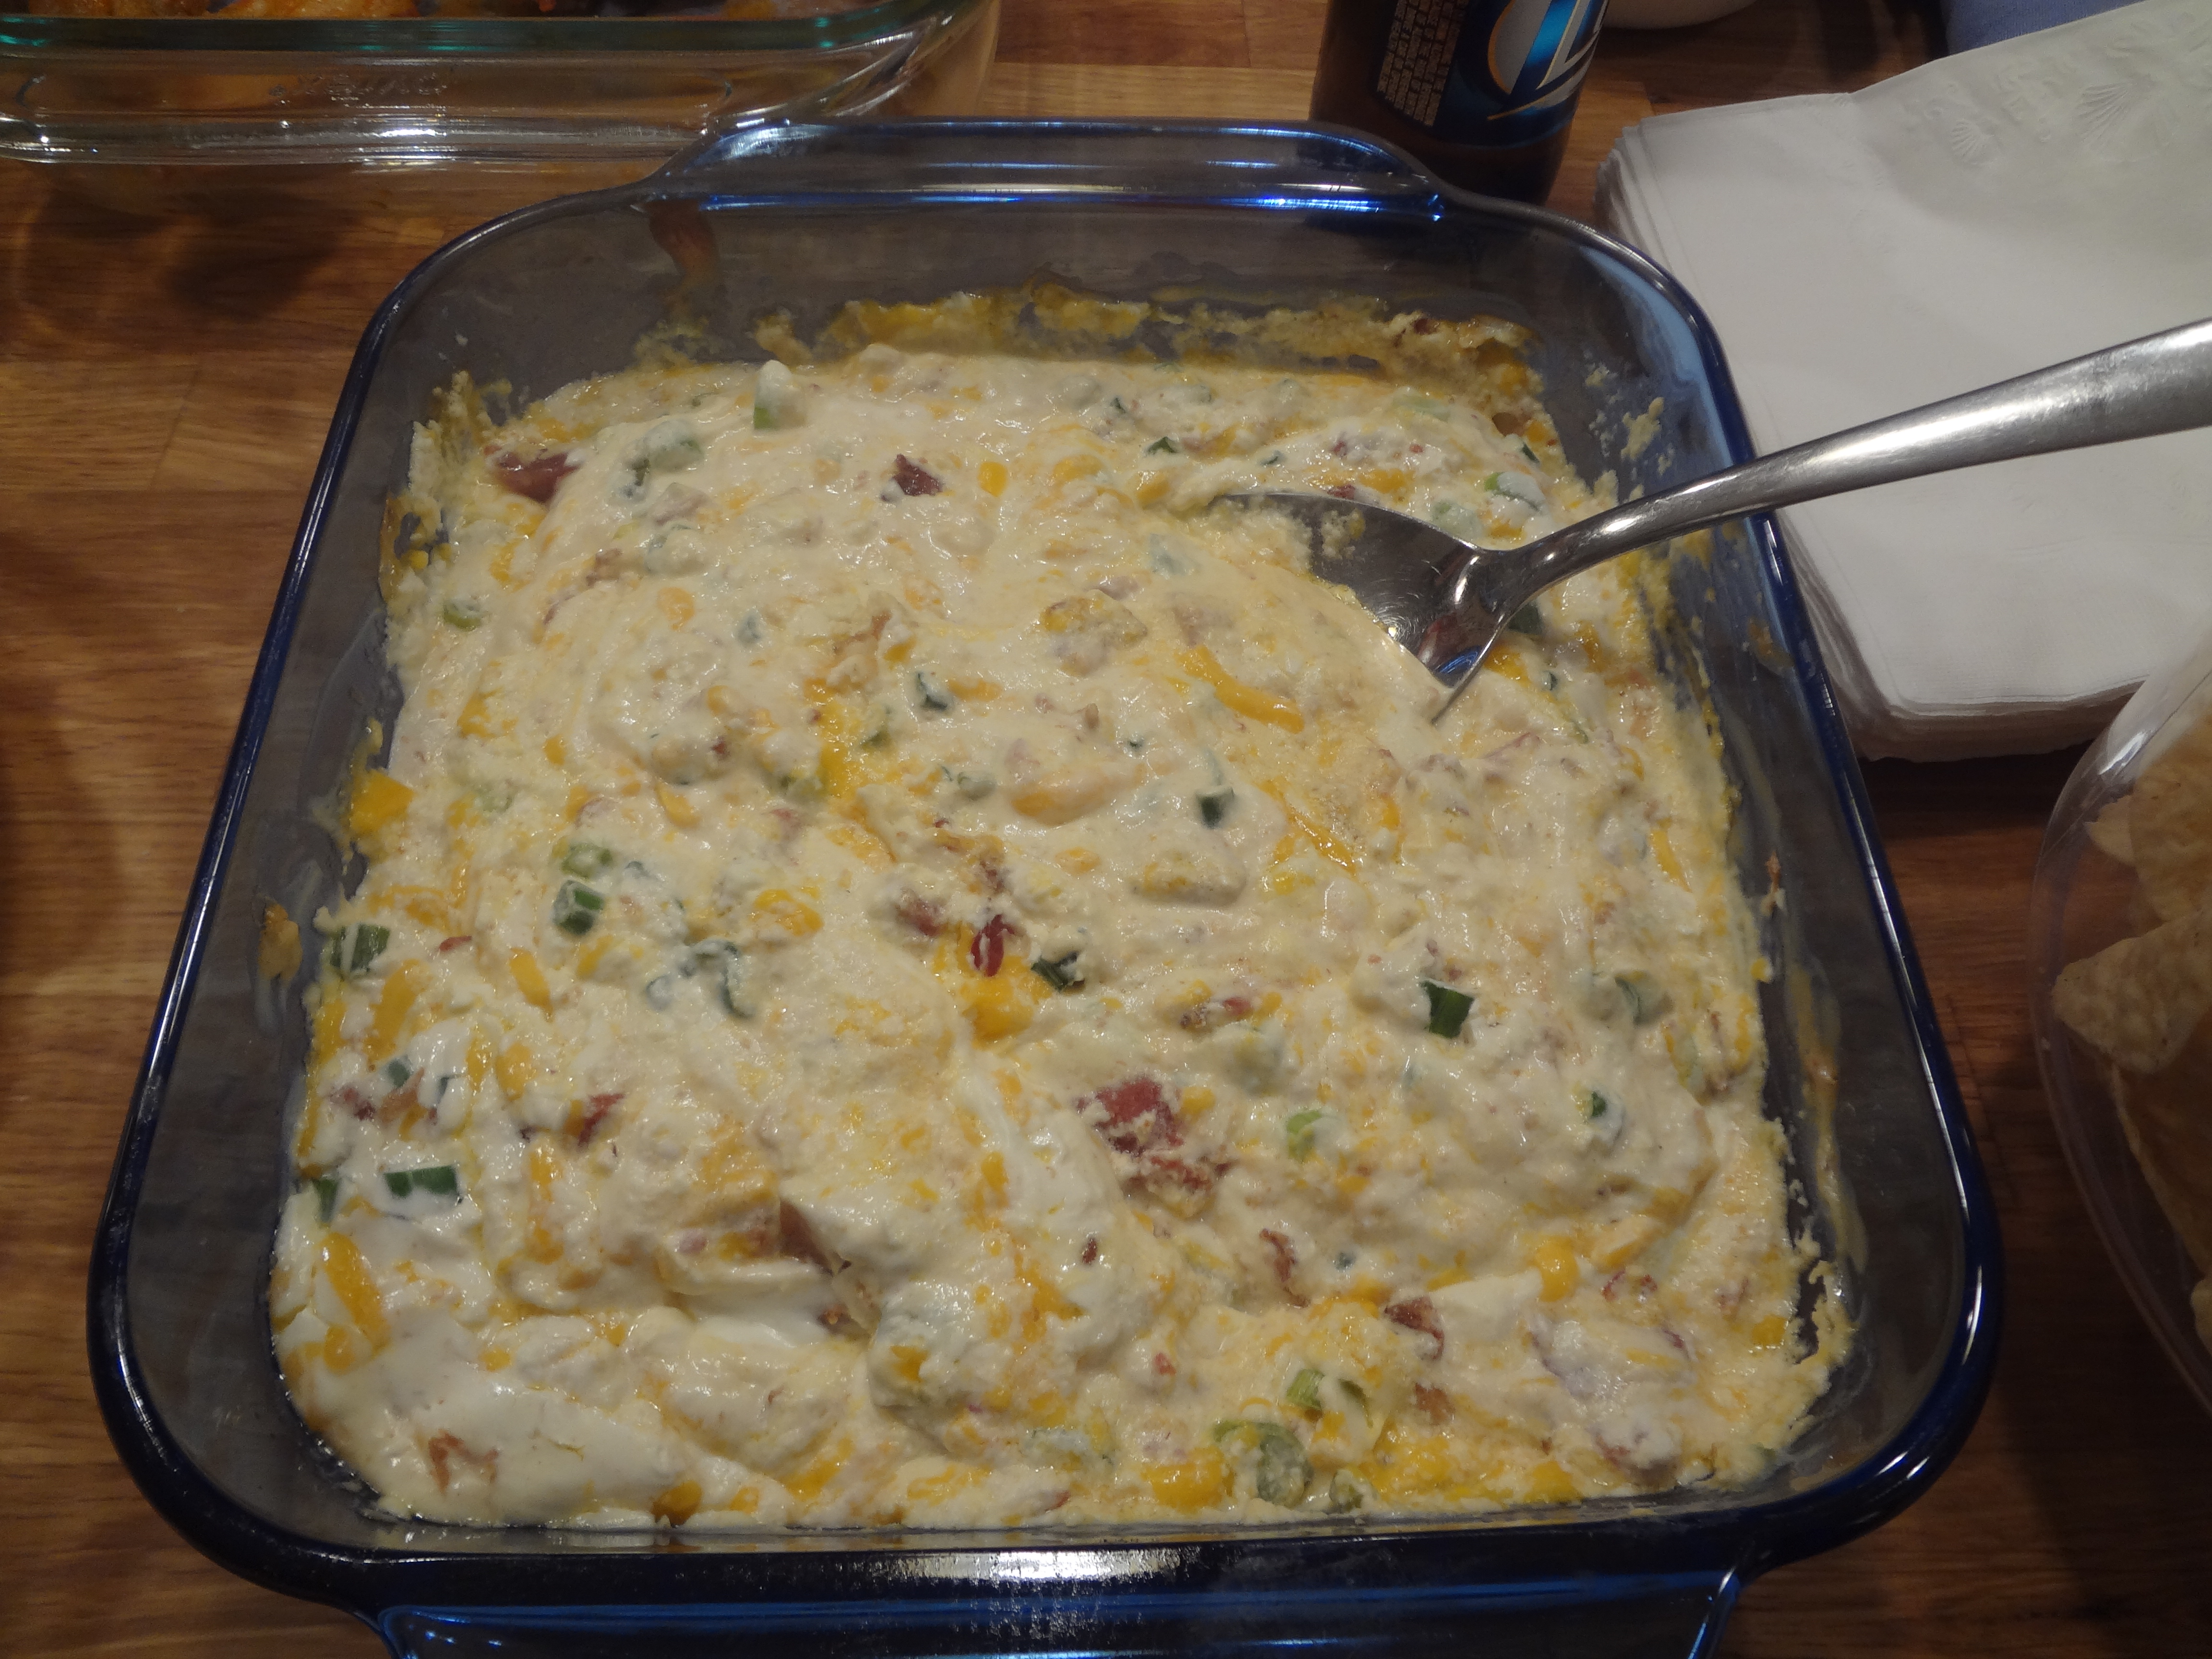
Recently I found out a friend of mine makes a pretty “slammin” (this word was used) Mac-N-Cheese……and who doesn’t love the sound of an amazing Mac -N-Cheese?   When I asked him for the recipe, he sent me a link to a blog I frequent and one that has been mentioned here a few times!  Fake Ginger!!   BUT he had put his own twist on it…tweaking her recipe…..and then I did some tweaking of my own with what I had on hand!  Needless to say…….the mac and cheese was really…..AMAZING!  Joe and I enjoyed it, the girls (after picking out the mushrooms)…Ava loved it, but Olivia couldn’t get past the mushrooms.  3 out 4 of us…not too shabby!!!   I’m not going to give it a “Kid Approved” rating because Olivia specifically said, “NOT KID APPROVED!” which eating it, but it’s really pretty tasty and if your kids like mushrooms….they’ll probably like it!

Here is the original from Fake Ginger.   Alan (“slammin” Mac-N-Cheese maker) used more bacon, a different variety of cheeses and topped it with crushed Cheez Its…..and I used less variety of cheeses,  topped it with Cheez Its and used more bacon!   So as you can see, you can really spin this  recipe any way you want….and it’ll still be a delicious spin off of your regular, every day Mac-N-Cheese!   Give it a shot!!

Bacon and Mushroom Mac-N-Cheese

1 pound small pasta

1 teaspoon olive oil

3/4 pound bacon, chopped

8 ounces baby bella mushrooms, sliced thinly

1/4 cup butter

1/4 cup flour

2 cups chicken broth

1 cup light cream

salt & pepper to taste

4 cups extra sharp cheddar, shredded

1 cup Swiss, shredded

1 cup mozzarella, shredded

1/2-3/4C Cheez Its, crushed

spray olive oil

••••••••••••••••••••••••••••••••••••••••••••••••••••••••••••••••••••••••••••••••••••••••••••••••••••••••••••
Bring a lot pot of salted water to a boil.
Add pasta, stir, and let boil.
Heat olive oil in a large skillet over medium heat.
Add bacon and cook, stirring occasionally, until bacon is cooked and slightly crispy.
Remove bacon to a paper towel, using a slotted spoon…onto a lined plate to drain.
Pour off some of the bacon grease (or all & add a little more olive oil to the pan) and add mushrooms. Cook until mushrooms are browned and soft, about 10 minutes. Set aside.
In a medium saucepan make a roux by melting your butter and slowly adding your flour.  Whisking the whole time.
Slowly add in chicken broth and cream, continue whisking until sauce is thickened.
Season with salt and pepper. Remove from heat and stir in cheeses until melted.
Preheat oven to 375.
Once pasta is al dente, drain and put in large bowl.
Add bacon, mushrooms, and cheese sauce and stir to combine.
Pour into prepared 9 x 13 pan.
Top with crushed Cheez Its,  over the entire pan and spray lightly with olive oil.
Bake in preheated oven for 20 minutes or until pasta is bubbly.
Enjoy!
DSC01570
~gianna~

Double Crunch Honey Garlic Chicken

One day I was looking for a new chicken recipe and found  this one during a google search.     I had all the ingredients needed (as I’m sure most people do) and decided to give it a shot!  I knew it was something everyone would like in my house and it sounded really good!  It was delicious!!!  The chicken had the perfect combo of crunch on the outside and tenderness on the inside and it was very flavorful and easy to make!    It was so good I even made it once using boneless pork chops!  I liked the chicken better for the tenderness of the meat, but the pork was good too!

Double Crunch Honey Garlic Chicken

4 large boneless skinless chicken breasts (halved into 8 thinner pieces)
2 cups flour
4 tsp salt
4 tsp black pepper
3 tbsp ground ginger
1 tbsp freshly ground nutmeg
2 tsp ground thyme
2 tsp ground sage
2 tbsp paprika
1 tsp cayenne pepper
4 eggs
8 tbsp water
2 tbsp olive oil
3-4 cloves minced garlic
1 cup honey
1/4 cup soy sauce (low sodium soy sauce is best)
1 tsp ground black pepper
 canola oil for frying

Slice the breasts by placing them flat on a cutting board and using a very sharp knife to slice them into halves horizontally.

Sift together the flour, salt, black pepper, ground ginger, nutmeg, thyme, sage paprika and cayenne pepper.

Whisk together the eggs and water in a separate bowl.

Season the chicken breasts with salt and pepper, then dip in the flour and spice mixture.

Then dip into the egg mixture and then a final time into the flour and spice mix, pressing the mix into the meat to get good contact.

Heat a skillet on the stove with about a half inch of canola oil covering the bottom.

NOTE FROM ORIGINAL RECIPE:  You will want to carefully regulate the temperature here so that the chicken does not brown too quickly. The thinness of the breast meat practically guarantees that it will be fully cooked by the time the outside is browned. I find just below medium heat works well. I use a burner setting of about 4 1/2 out of 10 on the dial and fry them gently for about 4 or 5 minutes per side until golden brown and crispy.

Drain chicken on wire rack for a few minutes and then dip chicken into the Honey Garlic Sauce. 

 Honey Garlic Sauce:
In a medium saucepan add olive oil and minced garlic. Cook over medium heat to soften the garlic but do not let it brown.
Add the honey, soy sauce and black pepper.
Simmer together for 5-10 minutes, remove from heat and allow to cool for a few minutes. Watch this carefully as it simmers because it can foam up over the pot very easily.

ENJOY!

Double Crunch Honey Chicken

~gianna~

Garlic Roasted Potatoes

This is my go to potato recipe for any meal that I need/want a starch.  It’s simple and delicious and takes no time to prepare, but they take an hour to cook, so if you want something quick and easy, but don’t have to leave the house…or need time to do other food prep….this is your recipe!  You can really use any potato cut into bite sized pieces, you don’t have to use red potatoes and with most potato recipe feel free to experiment with other spices/seasonings!

Garlic Roasted Red Potatoes 

(Barefoot Contessa)

3 lbs. of small red potatoes

¼ cup olive oil

1 ½ tsp kosher salt

1 tsp fresh ground black pepper

2 TBSP minced garlic (about 6 cloves)

Parsley (optional)

••••••••••••••••••••••••••••••••••••••••••••••••••••••••••••••••••••••••••••••••••••••••••

Preheat oven to 400° F. 

Cut clean potatoes in halves or quarters, leaving skins on. Place them in a bowl with the olive oil, salt, pepper & garlic; toss until potatoes are well-coated. 

Spray a large baking sheet well with cooking spray.

Dump potatoes onto baking sheet and spread into one layer.

Roast for at least an hour, until brown and crisp, TURNING them twice with a spatula during cooking so they will brown evenly.

Toss with a little parsley before serving.

Enjoy!

DSC01557

~gianna~

Maple Syrup Salmon

I first stumbled upon this recipe a few years ago on a message board I frequent… And ever since I found it…….I make it very often!

Whenever we are with friends or family eating….I hear a lot of “Your kids eat that?”  or “How do you get your kids to eat…….” and honestly…..I find recipes that are “kid friendly”, and when they aren’t….I make my kids something different, but they have to try it!  Usually when Olivia tries something…she either likes it or LOVES it….but once in awhile she won’t, and usually it’s something I wouldn’t have eaten as a child either (so I can’t blame her)!   Ava will pretty much say “I don’t like this!”  but she eats it anyway!  🙂  NOT THIS RECIPE THOUGH….both of my girls LOVE this salmon recipe….and when you make you will know why!  It’s so simple, takes hardly any time….and the combo of maple syrup and soy sauce make for a very yummy glaze!  I hope you enjoy it as much as we do!

Maple Syrup Salmon

1/4 cup maple syrup 

2 tablespoons soy sauce 

1 clove garlic, minced 

1/4 teaspoon garlic salt 

1/8 teaspoon ground black pepper 

1 pound salmon (skin removed)

••••••••••••••••••••••••••••••••••••••••••••••••••••••••••••••••••••••••••••••••••••••••••••••••••

In a small bowl, mix the maple syrup, soy sauce, garlic, garlic salt, and pepper. 

Place salmon in a shallow baking dish, and coat with the maple syrup mixture. Cover the dish, and marinate salmon in the refrigerator 30 minutes, turning once. 

Preheat oven to 400° F (200° C). 

Place the baking dish in the preheated oven, and bake salmon 20 minutes, or until easily flaked with a fork. 

ENJOY!

maplesyrupsalmon~gianna~
  

Previous Older Entries

I'm just starting out; leave me a comment or a like :)

They Like It...

  • None
REAL MOMS EAT PIZZA

Keepin it Real since February 18, 2014

Welcome to the world of NECCO!

News, crafts, recipes and more from the New England Confectionery Company (NECCO).

Pies Pizza & Pasta

Simple tasty convienient food done on a budget please leave any comments on the recipie you have tried or any changes or ideas you have so I can try them and add a post with the changes.

Chocolate, Chicken & Coconuts

"Every time you eat or drink, you're either feeding disease or fighting it"

Cooking with Mr Fitz

A collection of food journeys & taste-full experiences

Gusface Grillah

All things BBQ, bacon, dude food & beer.

ice cream magazine

................... for lovers of ice cream. Your free on line magazine for sweet frozen treats. Recipes, inspiration, artisanal ideas for your delectation.

The Daily Post

The Art and Craft of Blogging